The Elder: Difference between revisions
m (Just made a copy of "The Shaper must have survived throughout the entire boss fight in order to trigger the Unstable phase, and only successfully finishing the Unstable phase can have a chance to drop a Watcher's Eye." from strategy phase to the initial mentioning of Watcher's Eye) |
No edit summary |
||
| Line 26: | Line 26: | ||
Defeating the Elder is guaranteed to drop a [[map fragment]] required for the [[Uber Elder]] encounter, either {{il|Fragment of Terror}} or {{il|Fragment of Emptiness}}. The other 2 fragments are dropped by [[The Shaper]]. | Defeating the Elder is guaranteed to drop a [[map fragment]] required for the [[Uber Elder]] encounter, either {{il|Fragment of Terror}} or {{il|Fragment of Emptiness}}. The other 2 fragments are dropped by [[The Shaper]]. | ||
Items influenced by the Elder have a purple icon on its header [[File:Elder-item-symbol.png]] and have unique [[List of elder modifiers|Elder modifiers]]. Elder influenced items can drop from the Elder boss as well as from monsters killed in maps influenced by the Elder. | Items influenced by the Elder have a purple icon on its header [[File:Elder-item-symbol.png]] and have unique [[List of elder modifiers|Elder modifiers]]. Elder-influenced items can drop from the Elder boss as well as from monsters killed in maps influenced by the Elder. | ||
The fight with the Elder canonically takes place during the ''[[War for the Atlas]]'' endgame expansion timeline. Like other fragment bosses, the fight in the current expansion appears to be a parallel timeline or a re-enactment of the fight, rather than occurring in real-time in-universe. When the Conquerors of the Atlas expansion happened, the War for the Atlas finally ended. The events involving the Shaper, the Elder, and Zana were narratively moved from the character timeline (your exile) and the player timeline (you) to the historical timeline (unchanging and part of Wraeclast’s fabric before your character comes along). Astute observers will notice there is actually a second ‘day zero’ for the start of the Atlas endgame now: not the moment your exile washed up on shore, but the moment your exile walks into the Templar Laboratory and sees the map device explode.<ref>https://www.pathofexile.com/forum/view-thread/2912852</ref> As part of the canonization of the defeat of the Elder, the player characters who fought during the War for the Atlas expansion are represented by the [[Conquerors]]. | |||
[[File:The Uncharted Realms bossing.png|thumb|300px|[[The Uncharted Realms]] Atlas passive skill tree that enhances drops from [[The Shaper]], [[The Elder]] and from their respective guardians.]] | |||
{{Monster item drops|metadata_id=Metadata/Monsters/AtlasBosses/TheElder/TheElder}} | |||
The dropped {{il|Watcher's Eye}} is a 2 mods variant. In order for it to have a chance to drop, the Shaper must not be allowed to die during the Captured Phase (Phase 2) while he is channelling his beam. | |||
It can also drop {{il|Maven's Invitation: The Feared}}, even if [[The Maven]] is not present and observing the fight. | |||
==Entry== | ==Entry== | ||
| Line 180: | Line 188: | ||
===Phase 2 - Captured Phase=== | ===Phase 2 - Captured Phase=== | ||
[[File:Elder Phase 2.png|thumb|400px|The Captured Phase, where the Elder is captured by the Shaper (right) and the Shaper is channeling energy from the restraint (left)]] | [[File:Elder Phase 2.png|thumb|400px|The Captured Phase, where the Elder is captured by the Shaper (right) and the Shaper is channeling energy from the restraint (left)]] | ||
When the Elder is brought down to 25% life, the Shaper will capture | When the Elder is brought down to 25% life, the Shaper will capture it and bind it at the center of the arena. It will be invulnerable and the Shaper must channel to fully form all four restraints. You must protect him while the Elder spawns Null Portals that spawn multiple [[Madness Propagator]]s that can attack the Shaper. Each restraint takes 35 seconds to finish. The Elder will also attack with Tentacle Whip later in the phase. The Shaper performs his restraints in the following order: west, east, south, north. The number of Null Portals increases with each restraint. | ||
If the Shaper's life is brought down to 0, he will retreat and the Elder will be freed, and you must finish the rest of the fight | If the Shaper's life is brought down to 0, he will retreat and the Elder will be freed, allowing it to move and you must finish the rest of the fight with the Elder's full skillset from Phase 1. Successfully clearing this phase without letting the Shaper die will move you on to Phase 3 with the Elder having healed to full life. You can only obtain a {{il|Watcher's Eye}} if the Shaper is alive after phase 2 ends. | ||
The Shaper can be protected by blocking the Madness Propagators' projectiles with the player character, minions, totems, {{il|Frost Wall}}, or {{il|Vaal Glacial Hammer}}. Alternatively, the player can kill the Madness Propagators and Null Portals; however, both will continue to respawn on a short cooldown. The Shaper is considered an ally during this phase and can be healed with methods such as [[Consecrated Ground]], {{il|Vitality}}, or {{il|Rejuvenation Totem}}. Additionally, the Shaper can be affected by defensive [[aura]]s and can be [[fortified]]. | |||
===Phase 3 - Unstable Phase=== | ===Phase 3 - Unstable Phase=== | ||
Once all four restraints have formed, the Shaper will leave and the Elder is vulnerable once again. | Once all four restraints have formed, the Shaper will leave and the Elder is vulnerable once again. It will no longer move around the arena, but it will continue to spawn Null Portals and attack with: | ||
*'''Ice Spear''' | *'''Ice Spear''' | ||
*'''Tentacle Whip''' | *'''Tentacle Whip''' | ||
| Line 193: | Line 201: | ||
*'''Pulse Nova''' - The Elder will periodically release a large dark pulse that deals physical damage and covers the entire arena. | *'''Pulse Nova''' - The Elder will periodically release a large dark pulse that deals physical damage and covers the entire arena. | ||
When the Elder | When the Elder reaches 0 life in this phase, he will charge up a final lethal blast. [[Zana]] will appear at the bottom right side of the arena with a protective bubble with the voiceline "To me, exile! Quickly!" that the player must go into. Being outside of this bubble when the final blast explodes will cause the player to take a fatal amount of Physical damage that cannot be survived by most characters. The Elder cannot be [[cull]]ed in the Absence of Value and Meaning. | ||
The Elder | |||
==Version history== | ==Version history== | ||
Revision as of 12:33, 7 January 2022
| The Elder | |||
 | |||
| Level(s) | 83 | ||
| Location(s) | Absence of Value and Meaning | ||
| Quest(s) | The Memory Eater (legacy) The Eldritch Decay (legacy) | ||
| Health | 46 612 147 | ||
| Damage | 5740 | ||
| ApS | 1.85 | ||
| Resistance(s) | 50% Fire 50% Cold 50% Lightning 30% Chaos | ||
| Modifier(s) | 66% Less Curse Effectiveness Cannot Be Fully Slowed Immune To Knockback | ||
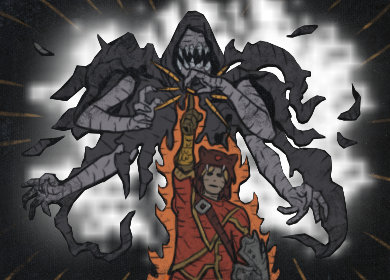
A creature of malignant madness, born of that oblivion from before time itself began. Once only an abstract expression, the Elder was given physical form. The Elder came here out of hunger. Preferring victims of a younger flesh, it became the bogeyman, dragging our children off into the night, casting them into its realm of shadow and feasting upon their nightmares undisturbed, for it was imagination that truly satiated it.
The Elder is a boss that is invading the Atlas of Worlds. He is the main antagonist of the War for the Atlas expansion. According to the lore of the Conquerors of the Atlas expansion, the Elder was slain by the Elderslayers led by Sirus, Awakener of Worlds, and was removed from the Atlas. Players can still fight the Elder using the ![]() Key to DecayKey to DecayCan be used in a personal Map Device.
Key to DecayKey to DecayCan be used in a personal Map Device.![]() map fragments set, and do not need to chase the Elder and Shaper across the Atlas anymore. These map fragments can be obtained by defeating the Elder Guardians.
map fragments set, and do not need to chase the Elder and Shaper across the Atlas anymore. These map fragments can be obtained by defeating the Elder Guardians.
The Elder is considered to be the easiest of the major Atlas bosses, and players with a high damage output can simply facetank the Elder and defeat him.
The Elder can drop a 2-mod ![]() Watcher's EyeWatcher's Eye
Watcher's EyeWatcher's Eye
Prismatic JewelLimited to: 1(4-6)% increased maximum Energy Shield
(4-6)% increased maximum Life
(4-6)% increased maximum Mana
<Two or Three random aura modifiers>One by one, they stood their ground against a creature
they had no hope of understanding, let alone defeating,
and one by one, they became a part of it.Place into an allocated Jewel Socket on the Passive Skill Tree. Right click to remove from the Socket.![]() that can be valued anywhere from a few
that can be valued anywhere from a few ![]() Chaos OrbsChaos OrbStack Size: 20Reforges a rare item with new random modifiersRight click this item then left click a rare item to apply it.
Chaos OrbsChaos OrbStack Size: 20Reforges a rare item with new random modifiersRight click this item then left click a rare item to apply it.![]() to dozens of
to dozens of ![]() Exalted OrbsExalted OrbStack Size: 20Augments a rare item with a new random modifierRight click this item then left click a rare item to apply it. Rare items can have up to six random modifiers.
Exalted OrbsExalted OrbStack Size: 20Augments a rare item with a new random modifierRight click this item then left click a rare item to apply it. Rare items can have up to six random modifiers.![]() if it has 2 mods that work extremely well together. Such items are highly valuable because they are unique, cannot be duplicated or replicated, and cannot be crafted by players. A more valuable version can drop from The Uber Elder, which can drop a 3-mod version of the eye.
The Shaper must have survived throughout the entire boss fight in order to trigger the Unstable phase, and only successfully finishing the Unstable phase can have a chance to drop a Watcher's Eye.
if it has 2 mods that work extremely well together. Such items are highly valuable because they are unique, cannot be duplicated or replicated, and cannot be crafted by players. A more valuable version can drop from The Uber Elder, which can drop a 3-mod version of the eye.
The Shaper must have survived throughout the entire boss fight in order to trigger the Unstable phase, and only successfully finishing the Unstable phase can have a chance to drop a Watcher's Eye.
Defeating the Elder is guaranteed to drop a map fragment required for the Uber Elder encounter, either ![]() Fragment of TerrorFragment of TerrorStack Size: 10Fear drives survival.Can be used in a personal Map Device.
Fragment of TerrorFragment of TerrorStack Size: 10Fear drives survival.Can be used in a personal Map Device.![]() or
or ![]() Fragment of EmptinessFragment of EmptinessStack Size: 10What is not cannot cause harm.Can be used in a personal Map Device.
Fragment of EmptinessFragment of EmptinessStack Size: 10What is not cannot cause harm.Can be used in a personal Map Device.![]() . The other 2 fragments are dropped by The Shaper.
. The other 2 fragments are dropped by The Shaper.
Items influenced by the Elder have a purple icon on its header ![]() and have unique Elder modifiers. Elder-influenced items can drop from the Elder boss as well as from monsters killed in maps influenced by the Elder.
and have unique Elder modifiers. Elder-influenced items can drop from the Elder boss as well as from monsters killed in maps influenced by the Elder.
The fight with the Elder canonically takes place during the War for the Atlas endgame expansion timeline. Like other fragment bosses, the fight in the current expansion appears to be a parallel timeline or a re-enactment of the fight, rather than occurring in real-time in-universe. When the Conquerors of the Atlas expansion happened, the War for the Atlas finally ended. The events involving the Shaper, the Elder, and Zana were narratively moved from the character timeline (your exile) and the player timeline (you) to the historical timeline (unchanging and part of Wraeclast’s fabric before your character comes along). Astute observers will notice there is actually a second ‘day zero’ for the start of the Atlas endgame now: not the moment your exile washed up on shore, but the moment your exile walks into the Templar Laboratory and sees the map device explode.[1] As part of the canonization of the defeat of the Elder, the player characters who fought during the War for the Atlas expansion are represented by the Conquerors.

Items found from this monster
| Item | Drop Level | |
|---|---|---|
Assassin's MittsEvasion: (260-369) Energy Shield: (52-75)Requires Level 58, 45 Dex, 45 Int+(40-50) to Dexterity (150-200)% increased Evasion and Energy Shield +(50-60) to maximum Life +6 to Maximum Life per Elder Item Equipped +4% to Damage over Time Multiplier for Ailments per Elder Item Equipped 8% increased Effect of Non-Damaging Ailments per Elder Item Equipped Remove an Ailment when you use a Flask if all Equipped Items are Elder ItemsReaching nature's limits, many sought power in the unnatural. | N/A | 58 |
Leather BeltRequires Level 68+(25-40) to maximum Life+(60-80) to maximum Life (5-15)% increased Attributes Cannot be Frozen if Dexterity is higher than Intelligence Cannot be Ignited if Strength is higher than Dexterity Cannot be Shocked if Intelligence is higher than Strength 1% increased Damage per 5 of your lowest AttributeWith the patience of a prowling lion, the Shade watched the Scholar. | N/A | 68 |
| 80 | 1 | |
| 80 | 1 | |
Ranger BowBow Physical Damage: 56-117 Elemental Damage: (130-150) to (270-300) Critical Strike Chance: 6.00% Attacks per Second: (1.49-1.62)Requires Level 60, 212 DexAdds (130-150) to (270-300) Cold Damage 4% increased Movement Speed per Frenzy Charge +(400-500) to Accuracy Rating (15-25)% increased Attack Speed 12 to 14 Added Cold Damage per Frenzy Charge 2% chance to Avoid Elemental Damage from Hits per Frenzy Charge 0.5% of Attack Damage Leeched as Life per Frenzy Charge 200 Cold Damage taken per second per Frenzy Charge while movingTheir last thoughts were not of their friends, or their families, or their homes. Their last thoughts were untethered from reality, and bathed in fear and ferocity. | N/A | 60 |
Onyx AmuletRequires Level 64+(10-16) to all Attributes(30-40)% increased Damage over Time Adds (17-19) to (23-29) Chaos Damage +(50-70) to maximum Life +(17-23)% to Chaos Resistance Despair has no Reservation if Cast as an Aura Gain Maddening Presence for 10 seconds when you Kill a Rare or Unique EnemyThough its body was locked in stone, its essence wandered the infinite, learning, and preparing. | N/A | 64 |
Onyx AmuletRequires Level 64+(10-16) to all AttributesAdds (20-24) to (33-36) Cold Damage +(50-70) to maximum Life (45-50)% increased Mana Regeneration Rate +(20-25)% to Cold Resistance Frostbite has no Reservation if Cast as an Aura Gain Maddening Presence for 10 seconds when you Kill a Rare or Unique EnemyThough its body was locked in stone, its essence wandered the infinite, learning, and preparing. | N/A | 64 |
Onyx AmuletRequires Level 64+(10-16) to all AttributesAdds (20-24) to (33-36) Fire Damage +(50-70) to maximum Life +(20-25)% to Fire Resistance Regenerate 1% of Life per second Flammability has no Reservation if Cast as an Aura Gain Maddening Presence for 10 seconds when you Kill a Rare or Unique EnemyThough its body was locked in stone, its essence wandered the infinite, learning, and preparing. | N/A | 64 |
Onyx AmuletRequires Level 64+(10-16) to all AttributesAdds (10-13) to (43-47) Lightning Damage +(50-70) to maximum Life +(20-25)% to Lightning Resistance Regenerate 1% of Energy Shield per second Conductivity has no Reservation if Cast as an Aura Gain Maddening Presence for 10 seconds when you Kill a Rare or Unique EnemyThough its body was locked in stone, its essence wandered the infinite, learning, and preparing. | N/A | 64 |
Onyx AmuletRequires Level 64+(10-16) to all AttributesAdds (12-16) to (20-25) Physical Damage +(400-500) to Armour +(50-70) to maximum Life (30-40)% increased Stun and Block Recovery Vulnerability has no Reservation if Cast as an Aura Gain Maddening Presence for 10 seconds when you Kill a Rare or Unique EnemyThough its body was locked in stone, its essence wandered the infinite, learning, and preparing. | N/A | 64 |
Modifiers and upgrades another Influenced Modifier Upgrading a modifier of the highest tier transforms the modifier into an Elevated Modifier Attempting to upgrade an Elevated Modifier rerolls its values Can be used on Body Armours, Boots, Gloves and HelmetsRight click this item then left click an item with at least two Influenced Modifiers to apply it. | 1 | 1 |
Nightmare MaceOne Handed Mace Physical Damage: (83-98) to (180-200) Critical Strike Chance: 5.00% Attacks per Second: 1.40 Weapon Range: 1.1 metresRequires Level 68, 212 Str10% reduced Enemy Stun ThresholdAdds (45-60) to (100-120) Physical Damage Gain (30-40)% of Physical Attack Damage as Extra Fire Damage +4% to Chaos Resistance per Endurance Charge 1% reduced Elemental Damage taken from Hits per Endurance Charge Adds 5 to 8 Physical Damage per Endurance Charge +500 to Armour per Endurance Charge 200 Fire Damage taken per second per Endurance Charge if you've been Hit RecentlyThey hoped that, trapped in its prison, the creature would age and perish. But time would not touch the fiend. | N/A | 68 |
Tornado WandWand Physical Damage: 25-75 Critical Strike Chance: 7.00% Attacks per Second: 1.30Requires Level 65, 212 IntAdds (3-5) to (70-82) Lightning Damage to Spells and Attacks(30-40)% increased Spell Damage Adds (26-35) to (95-105) Lightning Damage to Spells +(6-10)% to Critical Strike Multiplier per Power Charge +0.3% Critical Strike Chance per Power Charge +2% Chance to Block Spell Damage per Power Charge Adds 3 to 9 Lightning Damage to Spells per Power Charge 200 Lightning Damage taken per second per Power Charge if your Skills have dealt a Critical Strike RecentlyAll at once, a calmness would encompass them, and all at once, it would be torn away, unveiling forms no sound mind could grasp. | N/A | 65 |
 Void of the Elements Void of the Elements 3Overpowering Opal Ring 3Overpowering Opal RingItem Level: 100 Elder ItemThough the forces of nature are mighty and intimidating, it is their absence which should be feared. | 80 | 1 |
Prismatic JewelLimited to: 1(4-6)% increased maximum Energy Shield (4-6)% increased maximum Life (4-6)% increased maximum Mana <Two or Three random aura modifiers>One by one, they stood their ground against a creature they had no hope of understanding, let alone defeating, and one by one, they became a part of it.Place into an allocated Jewel Socket on the Passive Skill Tree. Right click to remove from the Socket. | N/A | 1 |
The dropped ![]() Watcher's EyeWatcher's Eye
Watcher's EyeWatcher's Eye
Prismatic JewelLimited to: 1(4-6)% increased maximum Energy Shield
(4-6)% increased maximum Life
(4-6)% increased maximum Mana
<Two or Three random aura modifiers>One by one, they stood their ground against a creature
they had no hope of understanding, let alone defeating,
and one by one, they became a part of it.Place into an allocated Jewel Socket on the Passive Skill Tree. Right click to remove from the Socket.![]() is a 2 mods variant. In order for it to have a chance to drop, the Shaper must not be allowed to die during the Captured Phase (Phase 2) while he is channelling his beam.
is a 2 mods variant. In order for it to have a chance to drop, the Shaper must not be allowed to die during the Captured Phase (Phase 2) while he is channelling his beam.
It can also drop ![]() Maven's Invitation: The FearedMaven's Invitation: The FearedModifiers to Item Quantity will affect the number of encounter rewards dropped
Maven's Invitation: The FearedMaven's Invitation: The FearedModifiers to Item Quantity will affect the number of encounter rewards dropped
The Maven must Witness:
Cortex,
Chayula's Domain,
The Alluring Abyss,
The Shaper's Realm,
Absence of Value and MeaningFor those who must not endure it,
there may be found a perverse joy
in watching the struggle for survival.Open portals to The Maven's Crucible by using this item in a personal Map Device.![]() , even if The Maven is not present and observing the fight.
, even if The Maven is not present and observing the fight.
Entry
Players must use the following fragments in their map device to fight The Elder. These fragments drop from the Elder Guardians, and they can also be traded amongst players.
 Fragment of PurificationFragment of PurificationStack Size: 10Corruption is purged, not cleansed.Can be used in a personal Map Device.
 Fragment of ConstrictionFragment of ConstrictionStack Size: 10Webs are torn, not untangled.Can be used in a personal Map Device.
 Fragment of EnslavementFragment of EnslavementStack Size: 10Freedom is won, not given.Can be used in a personal Map Device.
 Fragment of EradicationFragment of EradicationStack Size: 10Plagues are exhausted, not cured.Can be used in a personal Map Device.
The arena is called Absence of Value and Meaning.
Recommendations
The following is recommended:
- At least 1 million damage per second (rolling over your main attack ability should show 100K+, because Path of Exile cannot calculate DPS properly)
- A method to increase damage against unique enemies (such as Assassin's Mark for critical strike-based builds)
- Capped elemental resistances (fire, cold and lightning resistance at 75%)
- At least 6,000 Effective hit points (Life pool, Mana before Life, energy shield)
- At high block or evade chance, or damage taken as
Skills
| Image | Skill | Phase | Details |
|---|---|---|---|

|
Default Melee Attack | 1, 3 |
|

|
Ice Spears 1 | 1, 3 |
|

|
Ice Spears 2 | 1, 3 |
|

|
Ice Spears 3 | 1, 3 |
|

|
Siphon / Super Siphon |
1 |
|

|
Tentacle Slam | 1, 3 |
|

|
Expanding Nova / Ring of Death |
1, 3 |
|

|
Rising Slam | 1 |
|

|
Multi Expanding Nova | 3 |
|

|
Pulse Nova | 3 |
|

|
Zana's Bubble | 3 |
|
Video guide
Strategy
Phase 1
The Elder uses the following moves from the start:
- Default Attack
- Ice Spears
- Expanding Nova / Ring of Death
- Siphon
During the fight, Madness Propagators will spawn, which fires slow projectile shots and leaves a patch of eldritch decay permanently if it is left alive long enough, which deals physical damage over time while standing over them. Killing them quickly is important so that the arena does not become overwhelmed by them.
As the Elder's life gets lower, he will start using more attacks:
- Tentacle Whip
- Rising Slam
- Super Siphon
Phase 2 - Captured Phase

When the Elder is brought down to 25% life, the Shaper will capture it and bind it at the center of the arena. It will be invulnerable and the Shaper must channel to fully form all four restraints. You must protect him while the Elder spawns Null Portals that spawn multiple Madness Propagators that can attack the Shaper. Each restraint takes 35 seconds to finish. The Elder will also attack with Tentacle Whip later in the phase. The Shaper performs his restraints in the following order: west, east, south, north. The number of Null Portals increases with each restraint.
If the Shaper's life is brought down to 0, he will retreat and the Elder will be freed, allowing it to move and you must finish the rest of the fight with the Elder's full skillset from Phase 1. Successfully clearing this phase without letting the Shaper die will move you on to Phase 3 with the Elder having healed to full life. You can only obtain a ![]() Watcher's EyeWatcher's Eye
Watcher's EyeWatcher's Eye
Prismatic JewelLimited to: 1(4-6)% increased maximum Energy Shield
(4-6)% increased maximum Life
(4-6)% increased maximum Mana
<Two or Three random aura modifiers>One by one, they stood their ground against a creature
they had no hope of understanding, let alone defeating,
and one by one, they became a part of it.Place into an allocated Jewel Socket on the Passive Skill Tree. Right click to remove from the Socket.![]() if the Shaper is alive after phase 2 ends.
if the Shaper is alive after phase 2 ends.
The Shaper can be protected by blocking the Madness Propagators' projectiles with the player character, minions, totems, ![]() Frost WallFrost WallSpell, Duration, Cold
Frost WallFrost WallSpell, Duration, Cold
Level: (1-20)
Cost: (9-33) Mana
Cooldown Time: 3.00 sec
Can Store 3 Use(s)
Cast Time: 0.50 secRequires Level 4Creates a wall of ice which holds back enemies. Targets under the wall are damaged and pushed back.Deals (8-462) to (12-693) Cold Damage
Base duration is (3.00-4.90) seconds
0.15 seconds between appearance of Wall sections
Wall will be (2.8-5.6) meters long
Additional Effects From 1-20% Quality:
(2-40)% increased Cooldown Recovery RatePlace into an item socket of the right colour to gain this skill. Right click to remove from a socket.![]()
![]() , or
, or ![]() Vaal Glacial HammerVaal Glacial HammerAttack, Melee, Strike, Duration, AoE, Vaal, Cold
Vaal Glacial HammerVaal Glacial HammerAttack, Melee, Strike, Duration, AoE, Vaal, Cold
Level: (1-20)
Souls Per Use: 15
Can Store 3 Use(s)
Soul Gain Prevention: 4 sec
Attack Damage: (155-250)% of base
Effectiveness of Added Damage: (155-250)%Hits enemies, converting some of your physical damage to cold damage. It traps enemies with you in a circle of ice so that they can't escape. Requires a Mace, Sceptre or Staff.Base duration is (3.40-4.35) seconds
Modifiers to Skill Effect Duration also apply to this Skill's Soul Gain Prevention
25% chance to Freeze enemies
100% of Physical Damage Converted to Cold Damage
Freezes enemies as though dealing (200-390)% more Damage
Can't be Evaded
+0.2 metres to Melee Strike Range
35% increased Duration of Cold Ailments
(10-29)% increased Effect of Cold Ailments
Adds (2-75) to (3-113) Cold Damage against Chilled Enemies
Additional Effects From 1-20% Quality:
(2-40)% increased Duration of Cold AilmentsCorruptedPlace into an item socket of the right colour to gain this skill. Right click to remove from a socket.![]()
![]() . Alternatively, the player can kill the Madness Propagators and Null Portals; however, both will continue to respawn on a short cooldown. The Shaper is considered an ally during this phase and can be healed with methods such as Consecrated Ground,
. Alternatively, the player can kill the Madness Propagators and Null Portals; however, both will continue to respawn on a short cooldown. The Shaper is considered an ally during this phase and can be healed with methods such as Consecrated Ground, ![]() VitalityVitalityAura, Spell, AoE
VitalityVitalityAura, Spell, AoE
Level: (1-20)
Reservation: (28-233) Mana
Cooldown Time: 1.20 sec
Can Store 1 Use(s)
Cast Time: Instant
AoE Radius: 36Requires Level 10Casts an aura that grants life regeneration to you and your allies.+(0-1.9) metres to radius
You and nearby Allies Regenerate (10-193.2) Life per second
Additional Effects From 1-20% Quality:
(2-40)% increased Area of EffectPlace into an item socket of the right colour to gain this skill. Right click to remove from a socket.![]()
![]() , or
, or ![]() Rejuvenation TotemRejuvenation TotemTotem, Aura, Spell, AoE
Rejuvenation TotemRejuvenation TotemTotem, Aura, Spell, AoE
Level: (1-20)
Cost: (9-32) Mana
Cast Time: 0.60 sec
AoE Radius: 10Requires Level 4Summons a totem that has an aura which regenerates life for you and your nearby allies.Totem lasts 8 seconds
Supported Skills have (0-76)% increased Totem Life
Summons a Totem which uses this Skill
Regenerate (8.6-317.5) Life per second
Additional Effects From 1-20% Quality:
(1-20)% more Totem LifePlace into an item socket of the right colour to gain this skill. Right click to remove from a socket.![]()
![]() . Additionally, the Shaper can be affected by defensive auras and can be fortified.
. Additionally, the Shaper can be affected by defensive auras and can be fortified.
Phase 3 - Unstable Phase
Once all four restraints have formed, the Shaper will leave and the Elder is vulnerable once again. It will no longer move around the arena, but it will continue to spawn Null Portals and attack with:
- Ice Spear
- Tentacle Whip
- Expanding Nova / Ring of Death
- Pulse Nova - The Elder will periodically release a large dark pulse that deals physical damage and covers the entire arena.
When the Elder reaches 0 life in this phase, he will charge up a final lethal blast. Zana will appear at the bottom right side of the arena with a protective bubble with the voiceline "To me, exile! Quickly!" that the player must go into. Being outside of this bubble when the final blast explodes will cause the player to take a fatal amount of Physical damage that cannot be survived by most characters. The Elder cannot be culled in the Absence of Value and Meaning.
Version history
| Version | Changes |
|---|---|
| 3.9.0 |
|
| 3.2.0 |
|
| 3.1.0 |
|
References
See also
- Uber Elder - Dual boss fight along with the Shaper
- Book of Memories - Lore that provides the backstory of Valdo Caeserius's quest against the Elder
| Mechanics | |
|---|---|
| Characters | |
| Bosses | |
| Quests | |
| Atlas expansions | |