Atlas of Worlds

The Atlas of Worlds is Path of Exile's end-game map system. The Atlas is a series of linked maps that players can progress through after completing a quest for Commander Kirac. It is explored and discovered by running maps within the Map Device at the Karui Shores, a player's hideout, or a guild hideout.
The Atlas of Worlds is a visualization of the dream worlds that are opened by activating maps, indicating how these worlds are linked. The Atlas is comprised of 115 different maps connected to each other by paths.
Overview
To "run" a map, the player must normally place a consumable map item in the Map Device. This creates a new instance of that map. The map will contain monsters and treasures and one or more unique bosses. To successfully complete the map, the character(s) must defeat all of the unique bosses on that map.
Maps are divided into four tiers:
- Maps with tiers 1 through 5, which are marked "White"
- Maps with tiers 6 through 10, which are marked "Yellow"
- Maps with tiers 11 through 16, which are marked "Red"
- Maps with tier 17, a special map tier
At first, your access to the maps of the Atlas is very limited. When map items begin dropping in Act 8, they will only be for the four starting maps at the very bottom of the Atlas, the "tier 1" maps. All the other maps on the Atlas with "tier 2" or higher start out locked.
To unlock a map, the player must successfully complete that map at least once by beating the unique boss, either in a specific boss arena or roaming the map, depending on the map. Atlas progress is shared by all of a player's characters in a league. Once a map is unlocked, they can start dropping as loot.
In addition, there is an Atlas passive skill tree with perks that affect drops and improve various League mechanics features, such as Master missions and Extra Content, and Harbinger, etc. Atlas passive skill points can be earned by completing maps' bonus completion or Maven's invitations.
The Atlas has many end-game bosses that players can fight, such as The Searing Exarch, The Eater of Worlds and The Maven which requires completion of the Maven's challenges in The Maven's Crucible. Other bosses like Uber Elder and Sirus, Awakener of Worlds can be fought repeatedly by using a special set of 4 map fragments in the Map Device.
Map Drops

Map drops are not entirely random; instead, a specific tier is chosen first, and the map type is chosen from a pool of available maps for that tier or connected to the map the character is currently in.[1]
Only unlocked maps -- maps that the player has completed at least once in that league -- can normally drop as random map items. If a character is currently in a map instance, then map items for that map, and for maps directly connected to that map by a path on the Atlas can randomly drop whether they are unlocked or not.
A character can receive map items through means other than random drops. Map items -- even for maps that are still locked in the Atlas -- can be purchased from Kirac or other players. Completing a map through any of these means unlocking the map.
In addition, successfully completing a "legacy map" -- a map item from a previous version of the Atlas -- not only unlocks that map in the current Atlas, but unlocks all maps with a tier that is the same as or lower than the legacy map's tier. This can allow a new Standard league player or a player entering a new league to rapidly unlock maps that would not be accessible through random item drops.
Tier 17 maps
Tier 17 maps are special maps that can only drop from tier 16 maps with at least one Voidstone allocated and are not part of the Atlas of Worlds. They have 20% quality, can only be modified with ![]() Chaos OrbsChaos OrbStack Size: 20Reforges a rare item with new random modifiersRight click this item then left click a rare item to apply it.
Chaos OrbsChaos OrbStack Size: 20Reforges a rare item with new random modifiersRight click this item then left click a rare item to apply it.![]() , and have their own pool of map modifiers. The boss of these maps drop fragments that are used to fight "Uber" versions of various pinnacle bosses.
, and have their own pool of map modifiers. The boss of these maps drop fragments that are used to fight "Uber" versions of various pinnacle bosses.
![]() Valdo's Puzzle BoxValdo's Puzzle BoxStack Size: 10Contains a Mysterious Map with a Foil Unique RewardI can find no method of destroying the dangerous contents within...
Valdo's Puzzle BoxValdo's Puzzle BoxStack Size: 10Contains a Mysterious Map with a Foil Unique RewardI can find no method of destroying the dangerous contents within...
perhaps, someday, you will find a way.Right click to open.![]() contains a tier 17 foil maps. These maps have set modifiers and foil color chosen by its creator and rewards the listed foil unique item when completed.
contains a tier 17 foil maps. These maps have set modifiers and foil color chosen by its creator and rewards the listed foil unique item when completed.
Equity
When a map drop's tier is rolled and no maps of that tier currently exist on the atlas, a map isn't dropped but instead adds to a "Map Equity" system that helps higher tier maps to drop.[2][confirmation needed because of 3.10 change]
Each Tier grants a different value of Equity that accumulates.
The values are tripled per tier (powers of 3), so the amount of equity granted by a Tier 1 Map is 1, and thus a Tier 2 map is 3, Tier 3 Map is 9 etc.[3]
Map Equity checks possible map drops in descending order - by first checking if it's high enough to drop a Tier 16, then Tier 15, then Tier 14, so on and so forth.
A Tier 16 Map requires 14,348,907 Equity to drop.
There is equity cap - 143,489,070 Equity (10x Tier 16 maps).[3]
The Map Equity system makes modifiers that increase your chance of maps dropping in higher tiers also effectively increase your Map Equity gain. When all your maps on the Atlas are tier 16, this translates to more map drops.
Optional maps
Some maps are considered optional, either because they are special or because they have been removed from the Atlas entirely. Optional maps do not count towards completing the Atlas, and do not affect the various bonuses for doing so.
Special areas like Map fragments and misc map item zones are also considered optional.
Atlas Completion Bonus
You gain completion bonus for each map in the Atlas map completed for the first time under certain conditions:
- For a white map (a map with tier 1 through 5), you must complete a map with magic rarity.
- For a yellow map (a map with tier 6 through 10), you must complete a map with rare rarity.
- For a red map (a map with tier 11 through 16), you must complete a map with rare rarity and have the corrupted modifier.
Each bonus completions grants an Atlas passive skill point.
Pressing Alt while hovering over a map item shows whether the map completion bonus has been completed. This also works when selecting map missions from Commander Kirac.
Favoured Map System
The Favoured Map System allows you to find more of the maps you want to play. Favoured map slots can be unlocked by fulfilling various objectives like completing a Conqueror Map or defeating The Shaper. There are 12 Favoured Map Slots that can be unlocked.
| Slot | Condition |
|---|---|
| 1 | Complete a Tier 16 or 17 Map |
| 2 | Defeat an Elder Guardian |
| 3 | Defeat a Shaper Guardian |
| 4 | Defeat a Conqueror of the Atlas |
| 5 | Defeat Sirus, Awakener of Worlds |
| 6 | Defeat Venarius in the Cortex |
| 7 | Defeat The Shaper |
| 8 | Defeat The Elder (Uber Elder version) in The Shaper's Realm |
| 9 | Defeat The Maven |
| 10 | Defeat The Eater of Worlds |
| 11 | Defeat The Searing Exarch |
| 12 | Complete Maven's Invitation: The Feared |
Each time you Favourite a Map, it gains a 10x multiplier[4] to its drop chance when a Map of that tier drops. You can stack this multiplier on a single Map up to 12 times, giving a Map a 120x multiplier to its drop chance.
This does not increase the amount of Maps that drop but makes it much more likely for your Favourite Map(s) to drop.
For example, if you have 20 T16 Maps completed and a single Map with a 120x multiplier on it, you'll have 19 Maps with a weight of 1, and your Favourite Map will have a weight of 120, making it much more likely to be chosen.
Using the Atlas keystone Singular Focus, the player can choose to only receive favoured maps. Alternatively Shadow Shaping can be used to stop favoured maps from dropping.
Voidstones
The Eater of Worlds, The Searing Exarch, The Maven, and Uber Elder each drop a Voidstone when first defeated. Each Voidstone slotted into the Atlas increases the map base's tier by 4, to a maximum of tier 16, grants a +25% chance for dropped maps to be one tier higher, and 0.4% chance to convert a tier 16 map drop into a tier 17 map.
End of league transfer
When the current league ends the progress on the Atlas of Worlds is transferred to the relevant parent league. The parent league is generally Standard or Hardcore.
The merge has the following rules:[5]
- Maps or bonus objectives completed transferred to the parent league
- Sextant mods:
- They will be moved to the parent league; if the map already has a mod, the parent league mods will be kept
- Legacy modifiers continue to exist and work as long they have not been overridden
Permanent league catch up mechanics
A catch up mechanics was added to the Atlas since version 2.4.0.[6]
The latest rule is:[7]
- Running a high-tier map from a Legacy Map Series in Standard with the Bonus Objective and Awakening Bonus Objective prerequisites fulfilled will now auto-complete all maps with a base tier that is lower, including their Bonus Objectives and Awakening Bonus Objectives, if the Awakening Bonus Objective requirement was the same or lower than the completed map.
Since the Atlas shuffled every time at the start of new league and big patch (currently each time the game release the 3.X.0 patch). Using a T16 map (natural tier 16 map) from the legacy map series will unlock the completion of T1-15 maps. If it is a rare corrupted legacy map, it will also unlock all bonus Objective of the T1-15 map.
Gallery
-
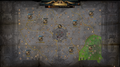
The 3.15 atlas. Showing the citadels and watchstone altars from the Conquerors of the Atlas expansion, socketed craftable watchstones, UI of the Uncharted Realms passive skill and the Maven progress bar from the Echoes of the Atlas expansion.
-

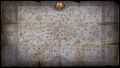
The Atlas introduced in Betrayal expansion with all maps completed.
-
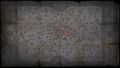
The Atlas introduced in War for the Atlas expansion with all maps completed.
-
The Atlas introduced in Atlas of Worlds expansion with all maps completed.
-
The Atlas screenshot from the Atlas of Worlds expansion official webpage
.png)


Version history
| Version | Changes |
|---|---|
| 3.24.0 |
|
| 3.23.0b |
|
| 3.20.0 |
|
| 3.19.0 |
|
| 3.18.0 |
|
| 3.17.0 |
|
| 3.16.0 |
|
| 3.14.0 |
|
| 3.13.1 |
|
| 3.13.0 |
|
| 3.11.0 |
|
| 3.10.0 |
|
| 3.9.3 |
|
| 3.9.2e |
|
| 3.9.2c |
|
| 3.9.1 |
|
| 3.9.0c |
|
| 3.9.0 |
|
| 3.5.0 |
|
| 3.4.0 |
|
| 3.3.0 |
|
| 3.1.0 |
|
| 2.4.0 |
|
See also
References
- ↑ Masterseek (August 13, 2016). "Path of Exile: Atlas of Worlds Interview. A Map of Condensed Hype.". 2p.com. Retrieved August 13, 2016.
- ↑ KarvarouskuGaming (January 19, 2020). "Issues concerning the new Atlas: 3) Removal of downgrade mechanics". Official Path of Exile Subreddit. Retrieved May 7, 2020.
- ↑ 3.0 3.1 Community_Team (May 27, 2021). "Game Mechanics Q&A Answer Part 2". Official Path of Exile Forums. Retrieved May 29, 2021.
- ↑ https://twitter.com/pathofexile/status/1238247907972853760?lang=en
- ↑ Negitivefrags (November 12, 2016). "[Question]What happens to the atlas and the sextant mods when essence gets transferred to standard?". Reddit. Retrieved January 25, 2017.
- ↑ Chris (August 24, 2016). "Detailed Atlas Mechanics". Path of Exile forums. Retrieved December 2, 2020.
- ↑ version 3.9.3 hotfix patch notes
| Mechanics | |
|---|---|
| Characters | |
| Bosses | |
| Quests | |
| Atlas expansions | |