Guide:Atlas quick guide: Difference between revisions
>Wonderfl (add basic steps for atlas and conqs) |
(updated) |
||
| (120 intermediate revisions by 13 users not shown) | |||
| Line 1: | Line 1: | ||
{{Guide|subject=endgame progression|date=March 27, 2024}} | |||
{| class="wikitable | This guide will show you how to discover [[The Envoy]], how to find [[The Maven]], and how to complete [[The Maven's Crucible]] and obtain [[Voidstone|Voidstones]] for the [[Atlas of Worlds]]. It will also shows you how to start completing your Atlas. | ||
==Unlocking Kirac== | |||
Skip this section if you have [[Kirac]] in your hideout. | |||
{| class="wikitable" | |||
! Step | ! Step | ||
! Image | ! Image | ||
| Line 8: | Line 13: | ||
|- | |- | ||
| 1 | | 1 | ||
| [[File: | | [[File:Kirac_in_War_Room.png|400px]] | ||
| | |Kirac will unlock as part of the quest [[A Call to Arms]] after the main campaign. Upon entering [[Karui Shores]] for the first time, talk to [[Helena]]. He will direct the player to the War Room to find and talk to [[Commander Kirac]]. He will give the player a Tier 1 [[map]]. | ||
|- | |||
| 2 | |||
| [[File:Kirac Map Portals.png|400px]] | |||
|Use that map (or any other gained during the Acts) on the {{il|Map Device}} and activate it. Enter any of the portals and explore the map. Defeat the Map Boss and return to [[Commander Kirac]] to complete the quest. Doing so unlocks Kirac in your hideout and allows you to use a Map Device in hideout. | |||
|- | |||
| 3 | |||
| [[File:Kirac Decoration.png|400px]] | |||
|Return to your hideout and Kirac should be visible. If he is not, add him into your hideout using the Decorations panel. | |||
The | |||
|} | |||
== Atlas Progression == | |||
{| class="wikitable" | |||
! Step | |||
! Image | |||
! Mechanic | |||
|- | |||
| 1 | |||
| [[File:Atlas map bonus complete.png|400px]] | |||
| In order to progress your atlas, lower tier [[Map|maps]] have to be completed to get access to atlas skill points and higher tier maps. Maps are completed when you kill the map boss for the first time. | |||
The message on the left shows after you have been granted the Bonus for a map by killing the boss of a {{c|magic|Magic}} white-tier map. Different tiers of map have to crafted to certain | |||
[[rarity]] in order to obtain the bonus [[Atlas Passive Skill Tree|Atlas]] points from that maps completion: | |||
* White-tier maps (1 to 5) have to be at least {{c|magic|Magic}} | |||
* Yellow-tier maps (6 to 10) have to be at least {{c|rare|Rare}} | |||
* Red-tier maps (11+) have to be {{c|rare|Rare}} and {{c|corrupted|Corrupted}} | |||
* [[Unique Maps|Unique maps]] on the Atlas award bonus points from just completion. | |||
|- | |- | ||
| 2 | | 2 | ||
| [[File:Atlas | | [[File:Atlas map stash tab bonus.png|400px]] | ||
| | | '''If you have the map stash tab, the indicator lines under a map tell you which bonus you have obtained:''' | ||
#Upon completion, a pale line show under the map. | |||
#If the line is bold, it means that you have obtained the Atlas Bonus by killing the boss once in a {{c|magic|Magic}}/{{c|rare|Rare}}/{{c|corrupted|Corrupted}} {{c|rare|Rare}} version of the map. | |||
|- | |- | ||
| 3 | | 3 | ||
| [[File:Atlas | | [[File:Atlas white map completion.png|400px]] | ||
| | | Open your Atlas to see the number of maps for which you have the Atlas Bonus. | ||
|- | |||
| 4 | |||
| [[File:Atlas white maps found.png|400px]] | |||
| Begin by completing '''white maps ''' from Tier 1 to Tier 5. | |||
This means to run or obtain any map that does NOT have the indicator lines in the map stash tab. | |||
Use the [[Atlas Passive Skill Tree]] to invest in Kirac and Maps to increase the drop rates for connected and higher level maps. | |||
|- | |||
| 5 | |||
| [[File:Map recipe.png|400px]] | |||
| You will naturally obtain map drops. If you need higher tier maps, you collect sets of 3 of the same map (white maps), and vendor them for 1 map of the higher tier. | |||
Tier 5 white maps will convert into Tier 6 yellow maps. | |||
|- | |||
| 6 | |||
| [[File:Zana map store.png|400px]] | |||
| Check Kirac's shop for new maps. His stock refreshes every time you activate a Kirac Atlas mission (it does not need to be completed). He will offer yellow and red maps as you work your way up through map tiers. Buying from his store is often cheaper than buying from other players. | |||
|- | |||
| 7 | |||
|[[File:Atlas yellow maps complete.png|400px]] | |||
|Now that you have completed a number of white maps, you should continue progressing into yellow (Tiers 6 to 10) and red maps (Tiers 11 to 16). | |||
|} | |||
== The Maven's Invitation == | |||
Skip this section if you already have a [[Maven's Invitation]]. | |||
{| class="wikitable" | |||
! Step | |||
! Image | |||
! Mechanic | |||
|- | |- | ||
| | | 1 | ||
| [[File: | | [[File:The Envoy appearence.png|400px]] | ||
|After | |After reaching yellow maps, [[The Envoy]] will eventually make an appearance. The Envoy will be highlighted and will mention that [[The Maven]] will be observing you. | ||
|- | |||
| 2 | |||
| [[File:The Maven watches 1.png|400px]] | |||
|Kill the map boss, and as you can see [[The Maven]] is present in the boss arena and observing the battle. | |||
|- | |||
| 3 | |||
| [[File:The Maven's Beacon.png|400px]] | |||
|After slaying the boss, The Maven will drop {{il|The Maven's Beacon}}, which is an untradable quest item. Pick it up. | |||
|- | |- | ||
| 4 | | 4 | ||
| [[File: | | [[File:The Maven's Beacon tip.png|400px]] | ||
| | |Return to your hideout and add the Maven's Beacon into your {{il|Map Device}} by clicking on your Map Device. | ||
This permanently upgrades your Map Device, giving you the ability to summon The Maven's presence on your maps. | |||
|- | |- | ||
| 5 | | 5 | ||
| [[File: | | [[File:The Maven's Beacon on map.png|400px]] | ||
| | |[[The Maven (Quest)]] will instruct you to defeat 3 Bosses of Tier 6+ Map with the Maven observing the battle. | ||
Click on the [[File:Call The Maven button.png]] '''Call The Maven''' button which requests the The Maven to observe your battle. | |||
|- | |- | ||
| 6 | | 6 | ||
| [[File: | | [[File:The Maven watches 2.png|400px]] | ||
| | |Complete a Tier 6+ Map and slay the boss again, you'll notice that The Maven pulsates to indicate that she is pleased. | ||
|- | |- | ||
| 7 | | 7 | ||
| [[File: | | [[File:The Maven holds recreation.png|400px]] | ||
| | |Once you have slain a map boss in The Maven's presence, it will show this message on the map: | ||
{{c|chaos|The Maven currently holds a recreation of this Map's Boss}} | |||
There is no point running this map as you cannot progress towards the The Maven's Challenge. | |||
|- | |- | ||
| 8 | | 8 | ||
| | | TBA | ||
| | | After killing the third Tier 6+ boss observed by The Maven, she will drop an invitation. Pick it up. | ||
|- | |- | ||
| 9 | | 9 | ||
| [[File: | | [[File:The Maven's Invitation map device.png|400px]] | ||
| | | The Maven's Invitation is a [[map fragment]], so add it into your {{il|Map Device}} and run it. | ||
|- | |- | ||
| 10 | | 10 | ||
| [[File: | | [[File:The Maven's Crucible portals.png|400px]] | ||
| | | 6 portals will open into [[The Maven's Crucible]]. Enter it to begin The Maven's Challenge. | ||
|- | |- | ||
| 11 | | 11 | ||
| [[File: | | [[File:The Maven's Crucible challenge.png|400px]] | ||
| | | All the bosses you have slain and captured will now be displayed in this realm. The Maven will be observing you. | ||
Go to the center of the area and click the device to start the encounter. | |||
|- | |- | ||
| 12 | | 12 | ||
| [[File: | | [[File:The Maven's Crucible battle.png|400px]] | ||
| | | Defeat all of the bosses that have now re-appeared within the Maven's Crucible. | ||
|- | |- | ||
| 13 | | 13 | ||
| [[File: | | [[File:The Maven's Gift.png|400px]] | ||
|The Atlas | | You will be given a passive atlas skill point. You can use {{c|quest|[[The Maven's Gift]]}} at the center of the arena to allocate skill points into your [[Atlas passive skill]] tree, if you wish. | ||
|- | |- | ||
| 14 | | 14 | ||
| [[File: | | [[File:The Maven portal.png|400px]] | ||
| | | After you are done, use the portals to return to your hideout. | ||
|- | |- | ||
| 15 | | 15 | ||
| | | TBA | ||
| | | Repeat Steps 5 and beyond with increasingly higher tier maps. | ||
|- | |- | ||
| 16 | | 16 | ||
| | | TBA | ||
| | | On {{il|Maven's Invitation: The Atlas}} and other special invitations, completing the encounter will drop {{il|Crescent Splinter|Crescent Splinters}}. Collecting 10 Crescent Splinters forms {{il|The Maven's Writ}}. | ||
|- | |||
| 17 | |||
| TBA | |||
| Use {{il|The Maven's Writ}} on the Map Device to challenge the Maven herself. Defeat her to receive a {{il|Ceremonial Voidstone}} and an {{il|Atlas Book of Skill}} from Kirac. | |||
|} | |||
Complete influenced maps to | == Eater of Worlds, The Searing Exarch and Voidstones == | ||
Skip this section if you know how to find [[Eater of Worlds]], [[The Searing Exarch]] and how to use [[Voidstone|Voidstones]]. | |||
{| class="wikitable" | |||
! Step | |||
! Image | |||
! Mechanic | |||
|- | |||
| 1 | |||
| TBA | |||
| Keep running maps. As you run maps tier 6 or higher, you may encounter the Envoy with the Maven. Speak to him and you will receive a {{il|Flesh Compass}} or {{il|Luminous Astrolabe}}. | |||
Your will receive the other item when you run a tier 11+ map. | |||
|- | |||
| 2 | |||
| TBA | |||
|Return to your hideout and add the Flesh Compass or Luminous Astrolabe into your {{il|Map Device}} by clicking on your Map Device. | |||
This permanently upgrades your Map Device, giving you the ability to add the Eater of Worlds or Searing Exarch influence to your maps. | |||
|- | |||
| 3 | |||
| TBA | |||
| Open a tier 9 map with one of the Eldritch influences activated. This adds packs of enemies aligned with the Searing Exarch or Eater of Worlds. | |||
Complete the map then complete another map with the same influence one tier higher to progress the questline. | |||
|- | |||
| 4 | |||
| TBA | |||
| Complete a tier 11 map with either influence and defeat the map boss. The boss will drop a {{il|page=Writhing Invitation (quest item)}} if it was Eater of Worlds influenced or a {{il|page=Polaric Invitation (quest item)}} if it was Searing Exarch influenced. | |||
|- | |||
| 5 | |||
| TBA | |||
| These Invitations are a [[map fragment]], so add it into your {{il|Map Device}} and run it. | |||
|- | |||
| 6 | |||
| TBA | |||
| 6 portals will open. Enter it to challenge the [[The Infinite Hunger]] or [[The Black Star]], depending on the Invitation. | |||
|- | |||
| 7 | |||
| TBA | |||
| Defeat the boss. Afterwards, speak to Kirac to receive an {{il|Atlas Book of Skill}}. | |||
|- | |||
| 8 | |||
| TBA | |||
| Continue completing maps of a higher tier with either influence. | |||
|- | |||
| 9 | |||
| TBA | |||
| Complete a tier 16 map with either influence and defeat the map boss. The boss will drop a {{il|page=Screaming Invitation (quest item)}} if it was Eater of Worlds influenced or an {{il|page=Incandescent Invitation (quest item)}} if it was Searing Exarch influenced. | |||
|- | |||
| 10 | |||
| TBA | |||
| Once again, add these Invitations into your {{il|Map Device}} and run it. | |||
|- | |||
| 11 | |||
| TBA | |||
| 6 portals will open. Enter it to challenge the [[The Eater of Worlds]] or [[The Searing Exarch]], depending on the Invitation. | |||
|- | |||
| 12 | |||
| TBA | |||
| Defeat the boss. The Eater of Worlds will drop a {{il|Grasping Voidstone}}, and the Searing Exarch will drop a {{il|Omniscient Voidstone}}. Speak to Kirac to receive an {{il|Atlas Book of Skill}}. | |||
|- | |||
| 13 | |||
| TBA | |||
| After defeating either the Eater of Worlds or the Searing Exarch for the first time, you can activate either influence on maps of tier 14 or higher. You will receive a {{il|page=Writhing Invitation}} or a {{il|page=Polaric Invitation}} the 14th you complete a map with the respective influence, then a {{il|page=Screaming Invitation}} or a {{il|page=Incandescent Invitation}} the 28th time, then the cycle repeats. These invitations are craftable and tradable. | |||
|- | |||
| 14 | |||
|[[File:Atlas Voidstones Progress.png|400px]] | |||
| Complete the questlines to defeat bosses and obtain Voidstones. Socket Voidstones in your atlas to increase the minimum level of your maps. | |||
There are currently four different Voidstones obtainable by defeating in approximate order of difficulty: | |||
* [[The Searing Exarch]] and [[The Eater of Worlds]] - Obtained by completing the [[The Searing Exarch (quest)]] and [[The Eater of Worlds (quest)]] respectively. | |||
* [[The Maven]] - Obtained by completing the [[The Maven (quest)]] and then earning {{il|The Maven's Writ}} and defeating the Maven. | |||
* [[The Uber Elder]] - Obtained by completing the [[The Elder (quest)]] and then earning {{il|Maddening Object}} and defeating the Uber Elder. | |||
|} | |} | ||
== Favoured Maps == | |||
{| class="wikitable" | |||
! Step | |||
! Image | |||
! Mechanic | |||
|- | |||
| 1 | |||
| [[File:Atlas favorite slot.png|400px]] | |||
| In order to obtain more of a specific map base, you can favorite it. But to favorite a map you need to first unlock the favorite slots. | |||
There are 12 unlockable Favoured Map slots. To unlock them, you must do one of the following: | |||
* Complete a Tier 16 Map | |||
* Defeat an [[Elder_Guardians|Elder Guardian]] | |||
* Defeat a [[Guardians_of_the_Void|Shaper Guardian]] | |||
* Defeat a [[Conquerors|Conqueror of the Atlas]] | |||
* Defeat [[Sirus,_Awakener_of_Worlds|Sirus, Awakener of Worlds]] | |||
* Defeat [[Cavas,_Forgotten_Spirit|Venarius]] in the [[Cortex]] | |||
* Defeat [[The_Shaper|The Shaper]] | |||
* Defeat [[Uber Elder]] | |||
* Defeat [[The_Maven|The Maven]] | |||
* Defeat [[The_Eater_of_Worlds|The Eater of Worlds]] | |||
* Defeat [[The_Searing_Exarch|The Searing Exarch]] | |||
* Complete [[The_Maven%27s_Crucible|Maven's Invitation: The Feared]] | |||
|- | |||
| 2 | |||
| [[File:Atlas favorite slot assign.png|400px]] | |||
| To favorite a map: | |||
#Open the Atlas and click on the favorite slot (circular icon) within the region on the left pane. | |||
#Then click on a map to favorite it. | |||
#The map's icon and name will show within the region on the left pane. | |||
You can change your favorites at any time. Favoriting the same map multiple times will increase the chances of it dropping. | |||
|} | |||
== Fifth Map Device Slot == | |||
The fifth slot of the [[Map Device]] is unlocked by completing a non-Valdo's [[tier 17 map]] for the first time. | |||
You can use the fifth slot to place one extra [[scarab]] or [[map fragment]] for more "juiced up" map runs. | |||
==Map crafting== | |||
Skip this section if you know the various map tiers, how to craft maps, how to add quality, etc. | |||
{| class="wikitable" | |||
! Image | |||
! Mechanic | |||
|- | |||
| [[File:Atlas map rarities.png|400px]] | |||
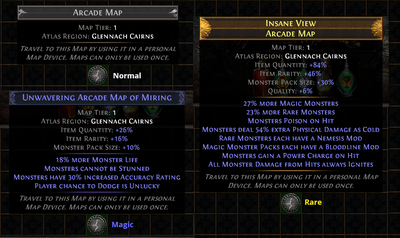
|The image shows the {{il|Arcade Map}}, in {{c|normal|Normal}}, {{c|magic|Magic}} and {{c|rare|Rare}} rarities. | |||
'''Basic crafting steps:''' | |||
*Using an {{il|Orb of Transmutation}} on a {{c|normal|Normal}} map will convert it into {{c|magic|Magic}} variety, with slightly harder fights but increased item quantity and [[rarity]] (if there is a mod that you cannot run, use an {{il|Orb of Alteration}} to reroll the mods) | |||
*Using an {{il|Orb of Alchemy}} on a {{c|normal|Normal}} map will convert it into {{c|rare|Rare}} variety, with harder fights but greatly increased item quantity and [[rarity]] (if there is a mod that you cannot run, use an {{il|Orb of Scouring}} to clear the mods and then "alch" it again) | |||
*Using a {{il|Vaal Orb}} on a {{c|rare|Rare}} map will permanently {{c|corrupted|Corrupt}} it, with hardest fights but granting the maximum possible rewards. Make sure the {{c|rare|Rare}} map has mods you can run, because corrupting a map is an irreversible process. | |||
* Use {{il|Cartographer's Chisel}}s on {{c|normal|Normal}} Red-tier maps to reach 20% quality (see below). | |||
{{Warning|Beware of maps with the mod {{c|mod|Monsters reflect X% of Physical Damage}} or {{c|mod|Monsters reflect X% of Elemental Damage}}, because you will be instantly killed if you do that type of damage and do not have a way to mitigate the [[Damage reflection|reflected damage]].}} | |||
|- | |||
| [[File:Map stash tab tiers.png|400px]] | |||
| | |||
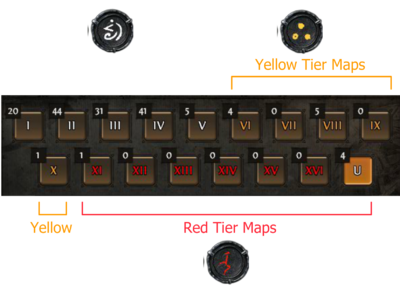
There are 3 tiers of maps, indicated by the color on the map icon. White maps are the most common and cheap. Yellow maps are more expensive. Red maps are the most valuable, and are the hardest to run and the most rewarding. When you run maps you'll automatically get a chance at obtaining maps of the next tier. | |||
'''To obtain maximum map drops within a map:''' | |||
*For white maps (Tier 1 to 5) - Use {{il|Orb of Alchemy}} on the map | |||
*For yellow maps (Tier 6 to 10) - Use {{il|Orb of Alchemy}}, optionally {{il|Vaal Orb}} (tougher mods but better rewards), optionally [[Scarab|Cartography Scarab]] | |||
*For red maps (Tier 11 to 15) - Use {{il|Orb of Scouring}}, 4 {{il|Cartographer's Chisel}} (20% quality), {{il|Orb of Alchemy}}, {{il|Vaal Orb}}, optionally [[Scarab|Cartography Scarab]] | |||
{{Tip|To obtain 20% map quality you need to use 20 {{il|Cartographer's Chisel}}s for {{c|rare|Rare}} maps. However for {{c|normal|Normal}} maps only 4 chisels are used to reach 20% quality. So remember to scour your map using an {{il|Orb of Scouring}} before using chisels.}} | |||
|} | |||
{{Navbox Atlas of Worlds}} | |||
[[Category:Guides]] | |||
Latest revision as of 22:24, 27 March 2024
This is a guide on the subject of endgame progression.
Last updated on March 27, 2024.
This guide will show you how to discover The Envoy, how to find The Maven, and how to complete The Maven's Crucible and obtain Voidstones for the Atlas of Worlds. It will also shows you how to start completing your Atlas.
Unlocking Kirac
Skip this section if you have Kirac in your hideout.
| Step | Image | Mechanic |
|---|---|---|
| 1 | 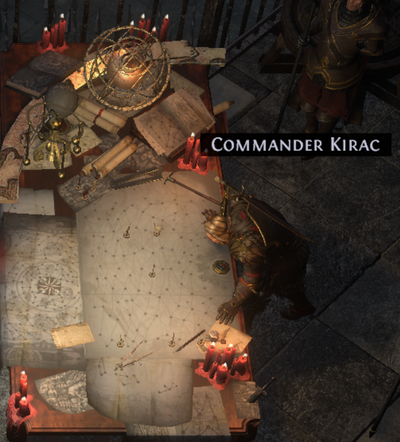
|
Kirac will unlock as part of the quest A Call to Arms after the main campaign. Upon entering Karui Shores for the first time, talk to Helena. He will direct the player to the War Room to find and talk to Commander Kirac. He will give the player a Tier 1 map. |
| 2 | 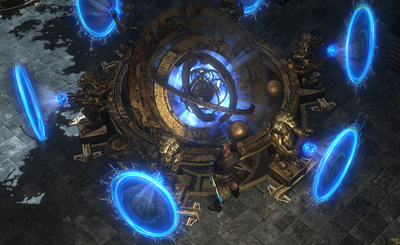
|
Use that map (or any other gained during the Acts) on the |
| 3 | 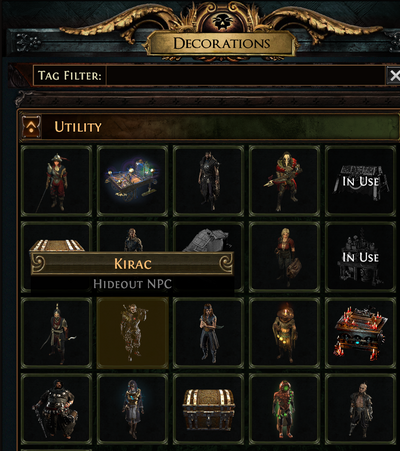
|
Return to your hideout and Kirac should be visible. If he is not, add him into your hideout using the Decorations panel.
|
Atlas Progression
| Step | Image | Mechanic |
|---|---|---|
| 1 | 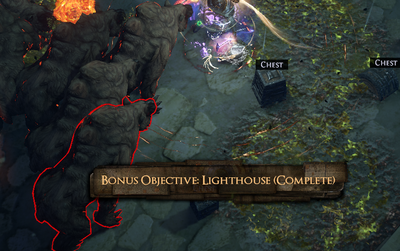
|
In order to progress your atlas, lower tier maps have to be completed to get access to atlas skill points and higher tier maps. Maps are completed when you kill the map boss for the first time.
The message on the left shows after you have been granted the Bonus for a map by killing the boss of a Magic white-tier map. Different tiers of map have to crafted to certain rarity in order to obtain the bonus Atlas points from that maps completion:
|
| 2 | 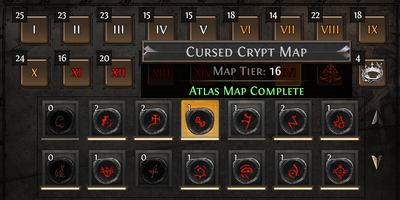
|
If you have the map stash tab, the indicator lines under a map tell you which bonus you have obtained:
|
| 3 | 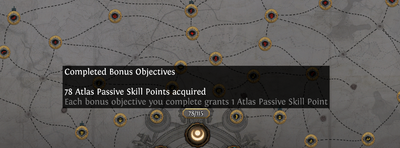
|
Open your Atlas to see the number of maps for which you have the Atlas Bonus. |
| 4 | 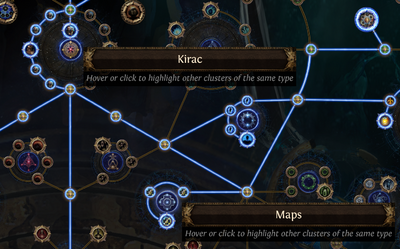
|
Begin by completing white maps from Tier 1 to Tier 5.
This means to run or obtain any map that does NOT have the indicator lines in the map stash tab. Use the Atlas Passive Skill Tree to invest in Kirac and Maps to increase the drop rates for connected and higher level maps. |
| 5 | 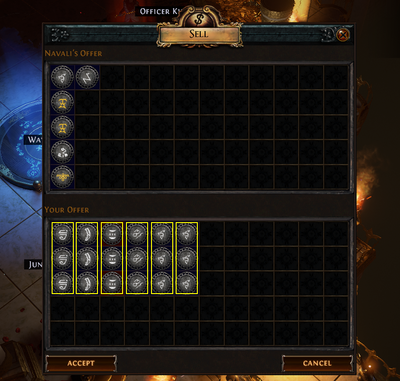
|
You will naturally obtain map drops. If you need higher tier maps, you collect sets of 3 of the same map (white maps), and vendor them for 1 map of the higher tier.
Tier 5 white maps will convert into Tier 6 yellow maps. |
| 6 | 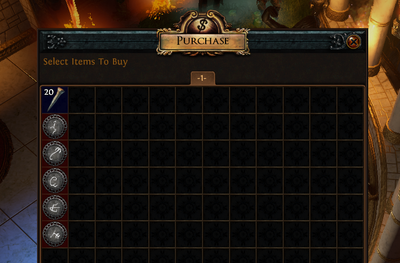
|
Check Kirac's shop for new maps. His stock refreshes every time you activate a Kirac Atlas mission (it does not need to be completed). He will offer yellow and red maps as you work your way up through map tiers. Buying from his store is often cheaper than buying from other players. |
| 7 | 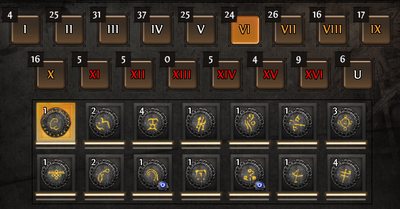
|
Now that you have completed a number of white maps, you should continue progressing into yellow (Tiers 6 to 10) and red maps (Tiers 11 to 16). |
The Maven's Invitation
Skip this section if you already have a Maven's Invitation.
| Step | Image | Mechanic |
|---|---|---|
| 1 | 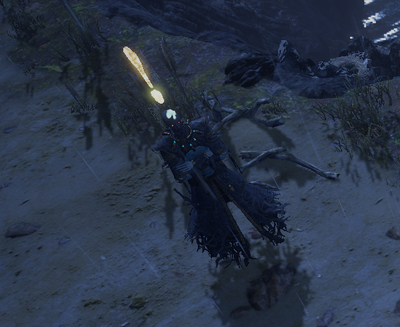
|
After reaching yellow maps, The Envoy will eventually make an appearance. The Envoy will be highlighted and will mention that The Maven will be observing you. |
| 2 | 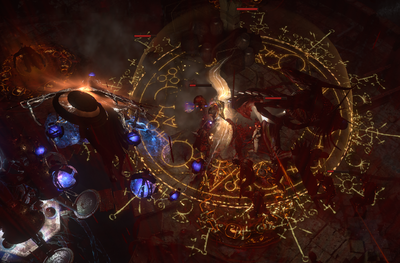
|
Kill the map boss, and as you can see The Maven is present in the boss arena and observing the battle. |
| 3 | After slaying the boss, The Maven will drop | |
| 4 | Return to your hideout and add the Maven's Beacon into your This permanently upgrades your Map Device, giving you the ability to summon The Maven's presence on your maps. | |
| 5 | The Maven (Quest) will instruct you to defeat 3 Bosses of Tier 6+ Map with the Maven observing the battle.
Click on the | |
| 6 | 
|
Complete a Tier 6+ Map and slay the boss again, you'll notice that The Maven pulsates to indicate that she is pleased. |
| 7 | 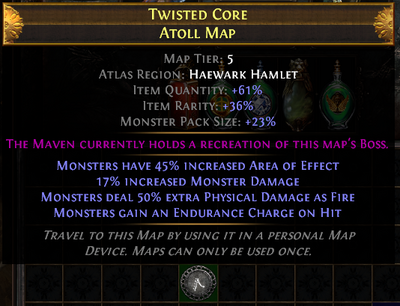
|
Once you have slain a map boss in The Maven's presence, it will show this message on the map:
The Maven currently holds a recreation of this Map's Boss There is no point running this map as you cannot progress towards the The Maven's Challenge. |
| 8 | TBA | After killing the third Tier 6+ boss observed by The Maven, she will drop an invitation. Pick it up. |
| 9 | 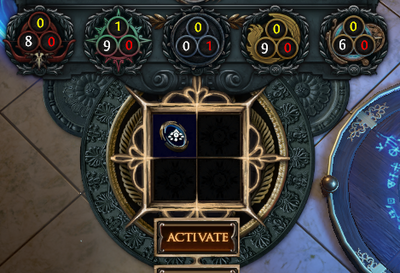
|
The Maven's Invitation is a map fragment, so add it into your |
| 10 | 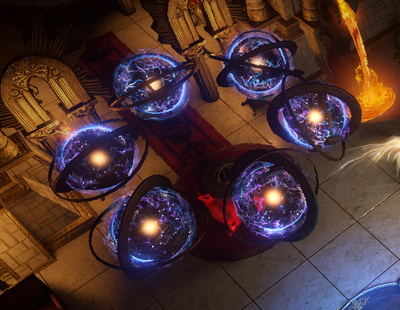
|
6 portals will open into The Maven's Crucible. Enter it to begin The Maven's Challenge. |
| 11 | 
|
All the bosses you have slain and captured will now be displayed in this realm. The Maven will be observing you.
Go to the center of the area and click the device to start the encounter. |
| 12 | 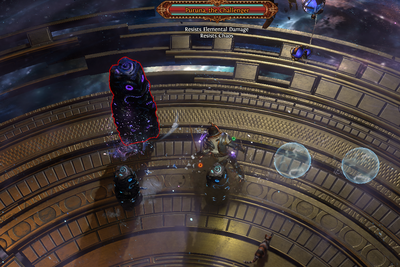
|
Defeat all of the bosses that have now re-appeared within the Maven's Crucible. |
| 13 | 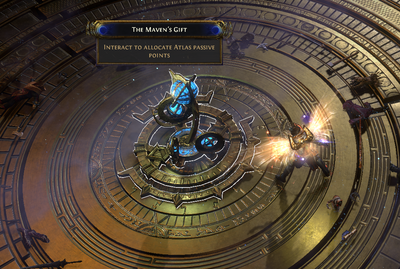
|
You will be given a passive atlas skill point. You can use The Maven's Gift at the center of the arena to allocate skill points into your Atlas passive skill tree, if you wish. |
| 14 | 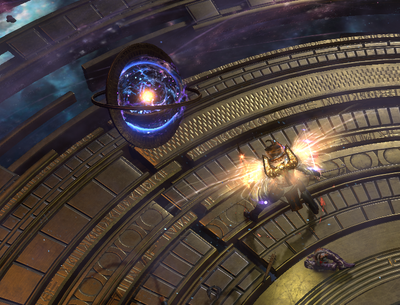
|
After you are done, use the portals to return to your hideout. |
| 15 | TBA | Repeat Steps 5 and beyond with increasingly higher tier maps. |
| 16 | TBA | On there may be found a perverse joy in watching the struggle for survival.Open portals to The Maven's Crucible by using this item in a personal Map Device. Tantalising and terrible.Combine 10 Crescent Splinters to create The Maven's Writ. It would also be foolish not to.Open a portal to Absence of Mercy and Empathy by using this item in a personal Map Device. Can only be used once. |
| 17 | TBA | Use It would also be foolish not to.Open a portal to Absence of Mercy and Empathy by using this item in a personal Map Device. Can only be used once. Tier 16 Maps Dropped in Areas have 0.4% chance to become a Tier 17 Map for each Socketed VoidstoneThe Maven knew nothing of mercy until she herself needed it.Socket this into your Atlas to increase the Tier of all Maps. |
Eater of Worlds, The Searing Exarch and Voidstones
Skip this section if you know how to find Eater of Worlds, The Searing Exarch and how to use Voidstones.
| Step | Image | Mechanic |
|---|---|---|
| 1 | TBA | Keep running maps. As you run maps tier 6 or higher, you may encounter the Envoy with the Maven. Speak to him and you will receive a Your will receive the other item when you run a tier 11+ map. |
| 2 | TBA | Return to your hideout and add the Flesh Compass or Luminous Astrolabe into your This permanently upgrades your Map Device, giving you the ability to add the Eater of Worlds or Searing Exarch influence to your maps. |
| 3 | TBA | Open a tier 9 map with one of the Eldritch influences activated. This adds packs of enemies aligned with the Searing Exarch or Eater of Worlds.
Complete the map then complete another map with the same influence one tier higher to progress the questline. |
| 4 | TBA | Complete a tier 11 map with either influence and defeat the map boss. The boss will drop a whole civilisations are digested - but do not die. there can be no escape. |
| 5 | TBA | These Invitations are a map fragment, so add it into your |
| 6 | TBA | 6 portals will open. Enter it to challenge the The Infinite Hunger or The Black Star, depending on the Invitation. |
| 7 | TBA | Defeat the boss. Afterwards, speak to Kirac to receive an |
| 8 | TBA | Continue completing maps of a higher tier with either influence. |
| 9 | TBA | Complete a tier 16 map with either influence and defeat the map boss. The boss will drop a reaches out for control of the Atlas. the Searing Exarch seeks to master the Atlas. |
| 10 | TBA | Once again, add these Invitations into your |
| 11 | TBA | 6 portals will open. Enter it to challenge the The Eater of Worlds or The Searing Exarch, depending on the Invitation. |
| 12 | TBA | Defeat the boss. The Eater of Worlds will drop a Tier 16 Maps Dropped in Areas have 0.4% chance to become a Tier 17 Map for each Socketed VoidstoneThe Eater of Worlds consumed for countless eons to satiate the desperation of masters that could never be satisfied.Socket this into your Atlas to increase the Tier of all Maps. Tier 16 Maps Dropped in Areas have 0.4% chance to become a Tier 17 Map for each Socketed VoidstoneThe Searing Exarch spread the Word of Enlightenment for countless eons without ever understanding its master's message.Socket this into your Atlas to increase the Tier of all Maps. |
| 13 | TBA | After defeating either the Eater of Worlds or the Searing Exarch for the first time, you can activate either influence on maps of tier 14 or higher. You will receive a whole civilisations are digested - but do not die.Open portals to Seething Chyme by using this item in a personal Map Device. there can be no escape.Open portals to Polaric Void by using this item in a personal Map Device. reaches out for control of the Atlas.Open portals to Absence of Symmetry and Harmony by using this item in a personal Map Device. the Searing Exarch seeks to master the Atlas.Open portals to Absence of Patience and Wisdom by using this item in a personal Map Device. |
| 14 | 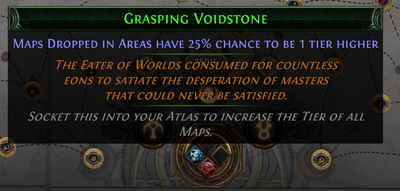
|
Complete the questlines to defeat bosses and obtain Voidstones. Socket Voidstones in your atlas to increase the minimum level of your maps.
There are currently four different Voidstones obtainable by defeating in approximate order of difficulty:
|
Favoured Maps
| Step | Image | Mechanic |
|---|---|---|
| 1 | 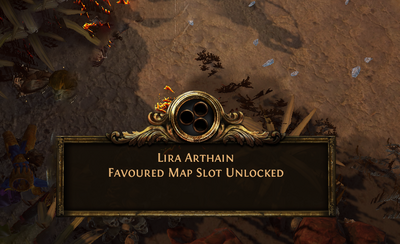
|
In order to obtain more of a specific map base, you can favorite it. But to favorite a map you need to first unlock the favorite slots.
There are 12 unlockable Favoured Map slots. To unlock them, you must do one of the following:
|
| 2 | 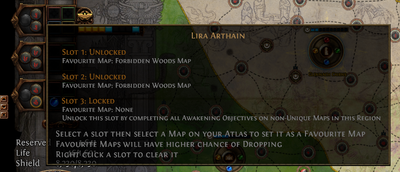
|
To favorite a map:
You can change your favorites at any time. Favoriting the same map multiple times will increase the chances of it dropping. |
Fifth Map Device Slot
The fifth slot of the Map Device is unlocked by completing a non-Valdo's tier 17 map for the first time.
You can use the fifth slot to place one extra scarab or map fragment for more "juiced up" map runs.
Map crafting
Skip this section if you know the various map tiers, how to craft maps, how to add quality, etc.
| Image | Mechanic |
|---|---|
|
The image shows the Map Tier: 2 Guild Character: +We create so that some part of us may remain after death.Travel to this Map by using it in a personal Map Device. Maps can only be used once. Basic crafting steps:
Warning: Beware of maps with the mod Monsters reflect X% of Physical Damage or Monsters reflect X% of Elemental Damage, because you will be instantly killed if you do that type of damage and do not have a way to mitigate the reflected damage.
|
|
There are 3 tiers of maps, indicated by the color on the map icon. White maps are the most common and cheap. Yellow maps are more expensive. Red maps are the most valuable, and are the hardest to run and the most rewarding. When you run maps you'll automatically get a chance at obtaining maps of the next tier. To obtain maximum map drops within a map:
Tip: To obtain 20% map quality you need to use 20 |
