Guide:Blight quick guide: Difference between revisions
>Wonderfl No edit summary |
>Wonderfl (add steps text) |
||
| Line 9: | Line 9: | ||
*A ranger or spellcaster build or any build that can do high amounts of area damage (melee builds using [[Cyclone]] without ''Cast-on-Crit'' will find it extremely hard) | *A ranger or spellcaster build or any build that can do high amounts of area damage (melee builds using [[Cyclone]] without ''Cast-on-Crit'' will find it extremely hard) | ||
*At least 2 million damage per second (rolling over your main attack ability should show 100K+, because Path of Exile cannot calculate DPS properly) | *At least 2 million damage per second (rolling over your main attack ability should show 100K+, because Path of Exile cannot calculate DPS properly) | ||
*A method to increase damage against rare and unique mini bosses (such as [[Assassin's Mark]] for crit-builds, or [[Sigil of Power]] for lightning-builds) | *A method to increase damage against {{c|rare|Rare}} and {{c|unique|Unique}} mini bosses (such as [[Assassin's Mark]] for crit-builds, or [[Sigil of Power]] for lightning-builds) | ||
*Capped elemental resistances (fire, cold and lightning resistance at 75%) | *Capped elemental resistances (fire, cold and lightning resistance at 75%) | ||
*At least 5,000 [[Effective hit points]] ([[Life]] pool) | *At least 5,000 [[Effective hit points]] ([[Life]] pool) | ||
| Line 23: | Line 23: | ||
| 1 | | 1 | ||
| [[File:Blight map ring annoint.png|400px]] | | [[File:Blight map ring annoint.png|400px]] | ||
| | | First annoint your rings to grant ''Scout Tower'' minions more damage. | ||
To do this, take your ring to [[Cassia]] at your hideout, and within the Annoint Items interface, place your ring along with 2 {{il|Amber Oil}}. | |||
Do this for both your rings. You can even annoint {{c|unique|Unique}} rings. | |||
|- | |- | ||
| 2 | | 2 | ||
| [[File:Blight map preparation.png|400px]] | | [[File:Blight map preparation.png|400px]] | ||
| | | To prepare your blighted map, first use an {{il|Orb of Scouring}} on it if it is not {{c|normal|Normal}} rarity. A rare map with more modifiers greatly increases the difficulty of the combat, and does not change the rewards from the reward chests. Only the central drop is affected, which is not the main reward anyway. | ||
Then use 4 {{il|Cartographer's Chisel}}s to add 20% quality. | |||
|- | |- | ||
| 3 | | 3 | ||
| [[File:Blight map annointing.png|400px]] | | [[File:Blight map annointing.png|400px]] | ||
| | | Take your map to Cassia, and annoint it with 3 {{il|Amber Oil}}. | ||
Annointing tips are as follows: | |||
*'''For T14 and lower maps:''' | |||
**3 {{il|Amber Oil}} is the easiest but no reward enhancement | |||
**1 {{il|Teal Oil}} and 2 {{il|Amber Oil}} is harder with better rewards | |||
**2 {{il|Teal Oil}} and 1 {{il|Amber Oil}} is much harder with much better rewards | |||
**3 {{il|Teal Oil}}s is the hardest with the best rewards | |||
*'''For T15 or T16 maps:''' | |||
**3 {{il|Amber Oil}} is the easiest but no reward enhancement | |||
**1 {{il|Crimson Oil}} and 2 {{il|Amber Oil}} is harder with better rewards | |||
**2 {{il|Crimson Oil}} and 1 {{il|Amber Oil}} is much harder with much better rewards | |||
**3 {{il|Crimson Oil}}s is the hardest with the best rewards | |||
|- | |- | ||
| 4 | | 4 | ||
| [[File:Blight map device.png|400px]] | | [[File:Blight map device.png|400px]] | ||
| | | Now place your annointed Blighted map into your [[map device]] and start it. | ||
*[[Watchstone]]s have no effect | |||
*[[Sextant]] modifiers on Watchstones have no effect | |||
*[[Scarab]]s have no effect | |||
|- | |- | ||
| 5 | | 5 | ||
| [[File:Blight map portal position.png|400px]] | | [[File:Blight map portal position.png|400px]] | ||
| | | The first thing to do is to run to one of the edges/corners of the map and place your [[Portal]] there, so you don't accidentally click on the Portal during an intensive fight and lose the encounter. | ||
|- | |- | ||
| 6 | | 6 | ||
| [[File:Blight map scout.png|400px]] | | [[File:Blight map scout.png|400px]] | ||
| | | Now scout around a map to get a feel of the map layout. | ||
|- | |- | ||
| 7 | | 7 | ||
| [[File:Blight map ichor pump.png|400px]] | | [[File:Blight map ichor pump.png|400px]] | ||
| | | Click the Ichor Pump near [[Cassia]] to begin the blight encounter. | ||
The '''Purification Pump''' is the big egg-like structure in the center, which you must defend at all costs. | |||
|- | |- | ||
| 8 | | 8 | ||
| [[File:Blight map started.png|400px]] | | [[File:Blight map started.png|400px]] | ||
| | | Now the Blight encounter has begun. You have 5 minutes to kill multiple waves of enemies and to defend the '''Purification Pump''' at all costs. | ||
*'''Countdown Timer''' is shown on the top | |||
*'''Monster Portals''' as well as the type of monsters shown on the bottom | |||
*'''Purification Pump Health Bar''' (durability) is shown on the bottom | |||
*'''Power Available''' for constructing towers is right at the bottom | |||
|- | |- | ||
| 9 | | 9 | ||
| [[File:Blight map empowering tower 1.png|400px]] | | [[File:Blight map empowering tower 1.png|400px]] | ||
| | | The first thing to do is build an Empowering Tower near to the Purification Pump. | ||
#To do this, click the '''Hammer''' icon nearest the Pump | |||
#Click '''Empowering Tower Mk 1''' | |||
#Click the '''Gear''' icon to upgrade it multiple times | |||
|- | |- | ||
| 10 | | 10 | ||
| [[File:Blight map empowering tower 2.png|400px]] | | [[File:Blight map empowering tower 2.png|400px]] | ||
| | | Click '''Imbuing Tower''' for the final upgrade to the Empowering Tower which increases your damage while you stand it in. | ||
As you can see the radius of the tower has also greatly increased. | |||
|- | |- | ||
| 11 | | 11 | ||
| [[File:Blight map first wave.png|400px]] | | [[File:Blight map first wave.png|400px]] | ||
| | | The first wave of monster portals has appeared. | ||
On the map you can see: | |||
*'''Monster Portal''' icons indicating the spawn points | |||
*'''Purification Pump''' icon indicating the main element to defend | |||
*'''Stars''' on the map show you where to place the Scout Towers | |||
|- | |- | ||
| 12 | | 12 | ||
| [[File:Blight map tower 1.png|400px]] | | [[File:Blight map tower 1.png|400px]] | ||
| | | Run to the first monster portal, and place down a '''Summoning Tower Mk 1'''. | ||
|- | |- | ||
| 13 | | 13 | ||
| [[File:Blight map tower 2.png|400px]] | | [[File:Blight map tower 2.png|400px]] | ||
| | | Click the gear icon multiple times to upgrade it. | ||
|- | |- | ||
| 14 | | 14 | ||
| [[File:Blight map tower 3.png|400px]] | | [[File:Blight map tower 3.png|400px]] | ||
| | | For the final upgrade on the Summoning Tower, select '''Scout Tower''' (wings icon). | ||
|- | |- | ||
| 15 | | 15 | ||
| [[File:Blight map junction tower.png|400px]] | | [[File:Blight map junction tower.png|400px]] | ||
| | | Next run to one of the junction points where 2 lanes converge, and then place down a '''Scout Tower''' over there. | ||
|- | |- | ||
| 16 | | 16 | ||
| [[File:Blight map second wave 1.png|400px]] | | [[File:Blight map second wave 1.png|400px]] | ||
| | | As the second wave starts you'll see many more Monster Portals appear and many more red dots (monsters) on your map. | ||
The goal is to place down '''Scout Towers''' on the junction points so that they can target monsters moving along multiple lanes. | |||
The map on the right shows the recommended locations for Scout Towers with '''Stars'''. | |||
|- | |- | ||
| 17 | | 17 | ||
| [[File:Blight map second wave 2.png|400px]] | | [[File:Blight map second wave 2.png|400px]] | ||
| | | As you can see, monsters on the right are moving upward, so we need to build at least 2 '''Scout Towers''' next to the lane to tackle them. | ||
Run around the map placing towers in this way. | |||
If the monsters are breaking through, build more towers in that region. | |||
|- | |- | ||
| 18 | | 18 | ||
| [[File:Blight map defence.png|400px]] | | [[File:Blight map defence.png|400px]] | ||
| | | After you are done with building towers in all the main regions of the map, return to the center, and attack any monsters that break through. | ||
You will be expected to deal a high amount of single-target damage for the mini bosses that spawn, as the towers may damage them but often fail to kill them. | |||
|- | |- | ||
| 19 | | 19 | ||
| [[File:Blight map complete.png|400px]] | | [[File:Blight map complete.png|400px]] | ||
| | | When you have killed all the monsters, the encounter will end and the central drops will appear on the ground. These are usually of low value. | ||
|- | |- | ||
| 20 | | 20 | ||
| [[File:Blight map looting.png|400px]] | | [[File:Blight map looting.png|400px]] | ||
| | | Run to the Blight Reward chests and loot them. This is where the primary profit comes from. | ||
|} | |} | ||
[[Category:Guides]] | [[Category:Guides]] | ||
Revision as of 10:17, 9 March 2021
The following guide shows you how to complete a Blighted map encounter. In blighted maps, players have 5 minutes to kill a great deal of monsters that spawn from fixed portals. These portals appear over the course of time and players are granted power to build towers. Each construction or upgradation of a tower costs a certain amount of power. As you kill enemies, you will earn more power. In this guide you will annoint your Blighted maps with ![]() Amber OilAmber OilStack Size: 10
Amber OilAmber OilStack Size: 10
Oil Tier: 3Can be combined with other Oils at Cassia to Enchant Rings or Amulets, or to modify Blighted Maps.![]() s, that decrease the cost of building and upgrading towers, allowing you to have far more towers.
s, that decrease the cost of building and upgrading towers, allowing you to have far more towers.
This guide uses the Scout Tower strategy, which is to place down towers that summon powerful flying minions to attack monsters, greatly reducing the amount of damage the player must do. There are various strategies and methods that can be used to successfully complete a Blight encounter and this is just one of them. This guide does not state that Scout Towers is the recommended strategy, however, it is the easiest method for beginners and learners to get started with Blighted maps.
In this strategy, you will be running around and placing Scout Towers at strategic locations and then staying in the center to kill the mini bosses that the towers cannot finish off.
Recommendations
The following is recommended:
- A ranger or spellcaster build or any build that can do high amounts of area damage (melee builds using Cyclone without Cast-on-Crit will find it extremely hard)
- At least 2 million damage per second (rolling over your main attack ability should show 100K+, because Path of Exile cannot calculate DPS properly)
- A method to increase damage against Rare and Unique mini bosses (such as Assassin's Mark for crit-builds, or Sigil of Power for lightning-builds)
- Capped elemental resistances (fire, cold and lightning resistance at 75%)
- At least 5,000 Effective hit points (Life pool)
- At least 20% block or evade chance, or Mana before Life defenses
Steps
| Step | Image | Mechanic |
|---|---|---|
| 1 | 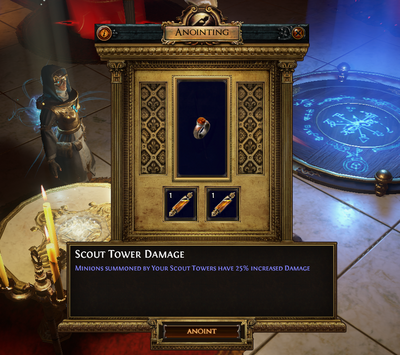
|
First annoint your rings to grant Scout Tower minions more damage.
To do this, take your ring to Cassia at your hideout, and within the Annoint Items interface, place your ring along with 2 Do this for both your rings. You can even annoint Unique rings. |
| 2 | 
|
To prepare your blighted map, first use an Then use 4 |
| 3 | 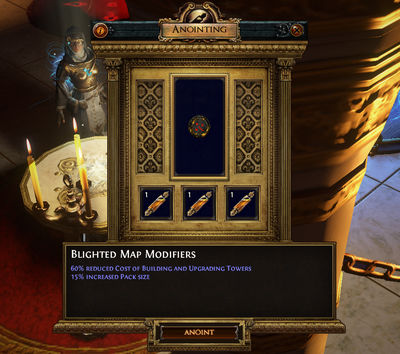
|
Take your map to Cassia, and annoint it with 3 Oil Tier: 3Can be combined with other Oils at Cassia to Enchant Rings or Amulets, or to modify Blighted Maps. Annointing tips are as follows:
|
| 4 | 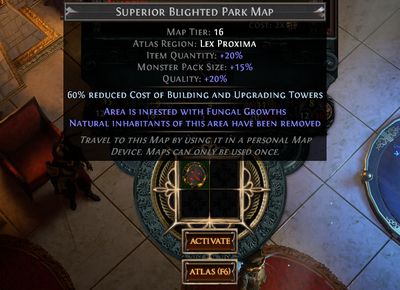
|
Now place your annointed Blighted map into your map device and start it.
|
| 5 | 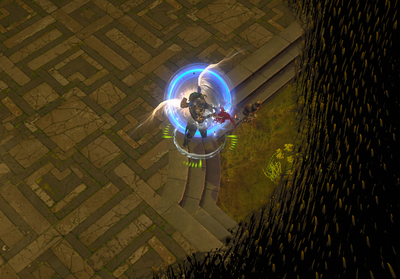
|
The first thing to do is to run to one of the edges/corners of the map and place your Portal there, so you don't accidentally click on the Portal during an intensive fight and lose the encounter. |
| 6 | 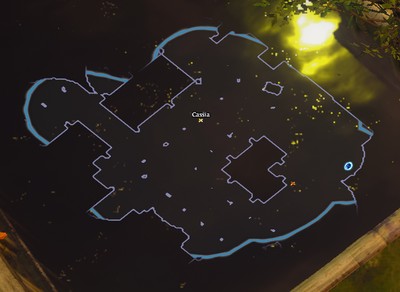
|
Now scout around a map to get a feel of the map layout. |
| 7 | 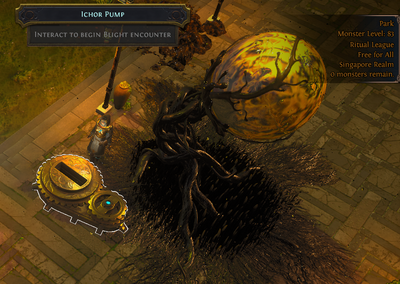
|
Click the Ichor Pump near Cassia to begin the blight encounter.
The Purification Pump is the big egg-like structure in the center, which you must defend at all costs. |
| 8 | 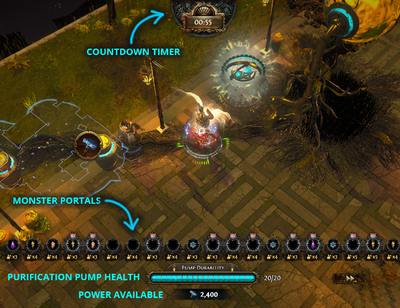
|
Now the Blight encounter has begun. You have 5 minutes to kill multiple waves of enemies and to defend the Purification Pump at all costs.
|
| 9 | 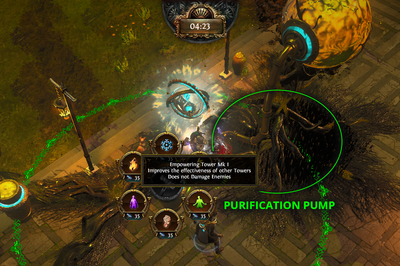
|
The first thing to do is build an Empowering Tower near to the Purification Pump.
|
| 10 | 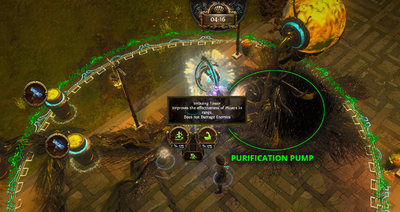
|
Click Imbuing Tower for the final upgrade to the Empowering Tower which increases your damage while you stand it in.
As you can see the radius of the tower has also greatly increased. |
| 11 | 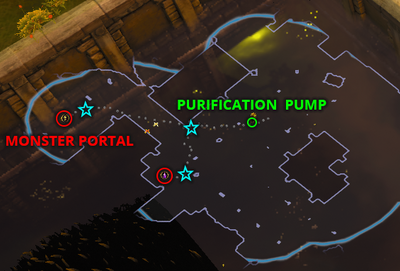
|
The first wave of monster portals has appeared.
On the map you can see:
|
| 12 | 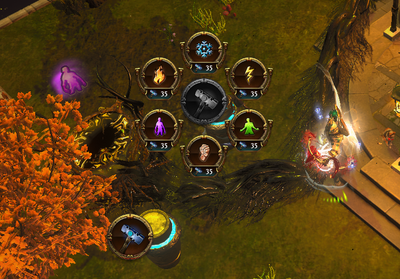
|
Run to the first monster portal, and place down a Summoning Tower Mk 1. |
| 13 | 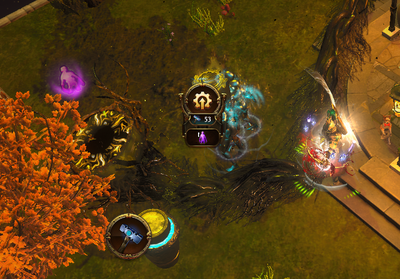
|
Click the gear icon multiple times to upgrade it. |
| 14 | 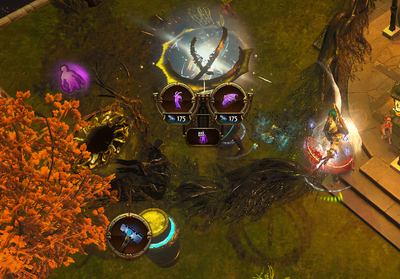
|
For the final upgrade on the Summoning Tower, select Scout Tower (wings icon). |
| 15 | 
|
Next run to one of the junction points where 2 lanes converge, and then place down a Scout Tower over there. |
| 16 | 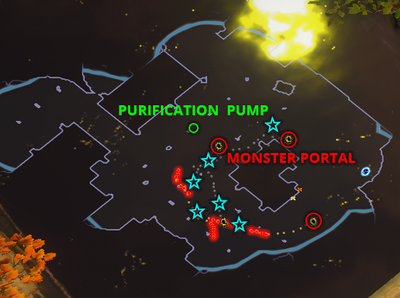
|
As the second wave starts you'll see many more Monster Portals appear and many more red dots (monsters) on your map.
The goal is to place down Scout Towers on the junction points so that they can target monsters moving along multiple lanes. The map on the right shows the recommended locations for Scout Towers with Stars. |
| 17 | 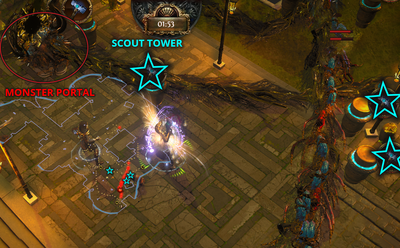
|
As you can see, monsters on the right are moving upward, so we need to build at least 2 Scout Towers next to the lane to tackle them.
Run around the map placing towers in this way. If the monsters are breaking through, build more towers in that region. |
| 18 | 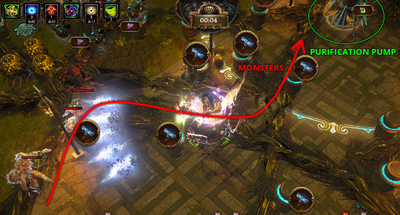
|
After you are done with building towers in all the main regions of the map, return to the center, and attack any monsters that break through.
You will be expected to deal a high amount of single-target damage for the mini bosses that spawn, as the towers may damage them but often fail to kill them. |
| 19 | 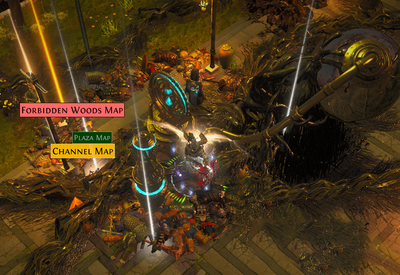
|
When you have killed all the monsters, the encounter will end and the central drops will appear on the ground. These are usually of low value. |
| 20 | 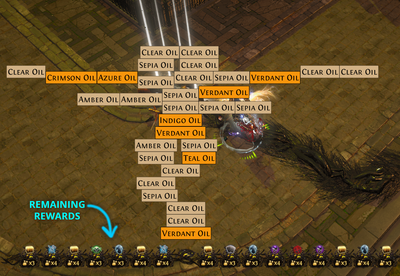
|
Run to the Blight Reward chests and loot them. This is where the primary profit comes from. |