|help_text = Travel to this Map by using it in the Eternal Laboratory or a personal Map Device. Maps can only be used once.
|help_text = Travel to this Map by using it in the Templar Laboratory or a personal Map Device. Maps can only be used once.
|purchase_cost_normal1_name = Orb of Chance
|purchase_cost_normal1_name = Orb of Chance
|purchase_cost_normal1_amount = 4
|purchase_cost_normal1_amount = 4
|purchase_cost_magic1_name = Orb of Chance
|purchase_cost_magic1_name = Orb of Chance
|purchase_cost_magic1_amount = 5
|purchase_cost_magic1_amount = 5
|purchase_cost_rare1_name = Orb of Chance
|purchase_cost_rare1_name = Orb of Chance
|purchase_cost_rare1_amount = 6
|purchase_cost_rare1_amount = 6
|purchase_cost_unique1_name = Chaos Orb
|purchase_cost_unique1_name = Chaos Orb
|purchase_cost_unique1_amount = 10
|purchase_cost_unique1_amount = 10
|map_tier = 6
|map_tier = 6
|map_guild_character = M
|map_guild_character = M
|map_area_id = MapAtlasWharf
|map_area_id = MapAtlasWharf
|map_area_level = 73
|map_series = Atlas of Worlds
|release_version = 2.4.0
|map_area_level = 73
|inventory_icon = Wharf Map (Atlas of Worlds)
|drop_enabled = False
|release_version = 2.4.0
}}
}}
[[File:Wharf t6.png|thumb]]
[[File:Wharf t6.png|thumb]]
Line 35:
Line 38:
*Casts Orb of Sparks (stationary single target lightning zapper)
*Casts Orb of Sparks (stationary single target lightning zapper)
*Summons 6 [[Flood Orb]]s from the water at 75/50/25% health
*Summons 6 [[Flood Orb]]s from the water at 75/50/25% health
Flood Orbs use {{sl|Cyclone}} and despawn after a minute or so. If you lure the boss away from the water level you don't have to bother with them.
Flood Orbs use {{il|Cyclone}} and despawn after a minute or so. If you lure the boss away from the water level you don't have to bother with them.
==Boss Video==
==Boss Video==
{{#ev:youtube|Z-DA-EpWbo8|300}}
{{#ev:youtube|Z-DA-EpWbo8|300}}
{{Item acquisition}}
==Vendor==
* Produced by three {{il|page=Peninsula Map|item_name=Peninsula Maps}}.
* Three [[Wharf Map]]s yield one {{il|page=Castle Ruins Map}}.
==Divination cards==
==Divination cards==
The following [[divination card]]s can drop in this area:
The following [[divination card]]s can drop in this area:
Line 52:
Line 51:
* {{il|Struck by Lightning}}
* {{il|Struck by Lightning}}
==Version history==
{{Map variants}}
{{VersionHistoryTable}}
{{VersionHistoryRow|0.11.2}}
{{#lst:Wharf Map|version history}}
* Bramblemist (the boss of the Wharf Map) has had its AI adjusted. Bramblemist also appears in the Descent race.
|}
[[Category:Docks tileset]]
[[Category:Docks tileset]]
Latest revision as of 15:46, 30 May 2024
Wharf MapMap Level: 73 Map Tier: 6 Guild Character: MTravel to this Map by using it in the Templar Laboratory or a personal Map Device. Maps can only be used once.
Acquisition Drop disabled Drop level: 73Vendor Prices
Casts Orb of Sparks (stationary single target lightning zapper)
Summons 6 Flood Orbs from the water at 75/50/25% health
Flood Orbs use CycloneCycloneAttack, AoE, Movement, Channelling, Physical, Melee Level: (1-20) Cost: 2 Mana Attack Speed: 300% of base Attack Damage: (44-59)% of base Effectiveness of Added Damage: (44-59)% AoE Radius: 1.6Requires Level 28Channel this skill to move towards a targeted location while spinning constantly attacking enemies in an area around you. While channelling this skill, you cannot be knocked back.(5-28) to (8-42) Added Attack Physical Damage 10% increased Area of Effect per 0.1 metre additional Melee Strike Range 30% less Movement Speed
Additional Effects From 1-20% Quality: (0.5-10)% more Movement SpeedPlace into an item socket of the right colour to gain this skill. Right click to remove from a socket. and despawn after a minute or so. If you lure the boss away from the water level you don't have to bother with them.
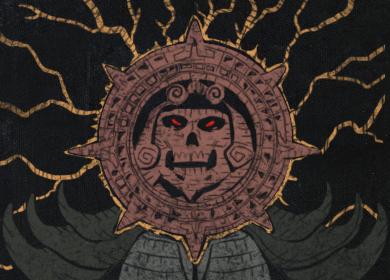
The Coming StormThe Coming Storm8Lightning CoilNo man may hope to turn back the storm. You can only hope you do not attract its ire.
Struck by LightningStruck by Lightning3Electrocuting Jewellery Item Level:76'Lightning never strikes the same place twice' is really just wishful thinking.
Map variants
Item
Map Tier
Map Level
Map Series
Wharf MapWharf MapMap Level: 69 Map Tier: 2 Guild Character: ËReach out into the abyss, and the abyss reaches back.Travel to this Map by using it in a personal Map Device. Maps can only be used once.
2
69
Necropolis
Wharf MapWharf MapMap Level: 77 Map Tier: 10 Guild Character: ËReach out into the abyss, and the abyss reaches back.Travel to this Map by using it in a personal Map Device. Maps can only be used once.
10
77
Affliction
Wharf MapWharf MapMap Level: 81 Map Tier: 14 Guild Character: ËReach out into the abyss, and the abyss reaches back.Travel to this Map by using it in a personal Map Device. Maps can only be used once.
14
81
Ancestor
Wharf MapWharf MapMap Level: 79 Map Tier: 12 Guild Character: ËReach out into the abyss, and the abyss reaches back.Travel to this Map by using it in a personal Map Device. Maps can only be used once.
12
79
Crucible
Wharf MapWharf MapMap Level: 72 Map Tier: 5 Guild Character: ËReach out into the abyss, and the abyss reaches back.Travel to this Map by using it in a personal Map Device. Maps can only be used once.
5
72
Kalandra
Wharf MapWharf MapMap Level: 78 Map Tier: 11 Guild Character: ËReach out into the abyss, and the abyss reaches back.Travel to this Map by using it in a personal Map Device. Maps can only be used once.
11
78
Sentinel
Wharf MapWharf MapMap Level: 71 Map Tier: 4 Guild Character: ËReach out into the abyss, and the abyss reaches back.Travel to this Map by using it in a personal Map Device. Maps can only be used once.
4
71
Scourge
Wharf MapWharf MapMap Level: 70 Map Tier: 3 Guild Character: ËReach out into the abyss, and the abyss reaches back.Travel to this Map by using it in a personal Map Device. Maps can only be used once.
3
70
Expedition
Wharf MapWharf MapMap Level: 69 Map Tier: 2 Guild Character: ËReach out into the abyss, and the abyss reaches back.Travel to this Map by using it in a personal Map Device. Maps can only be used once.
2
69
Ritual
Wharf MapWharf MapMap Level: 72 Map Tier: 5 Guild Character: ËReach out into the abyss, and the abyss reaches back.Travel to this Map by using it in a personal Map Device. Maps can only be used once.
5
72
Heist
Wharf MapWharf MapMap Level: 72 Map Tier: 5 Guild Character: ËReach out into the abyss, and the abyss reaches back.Travel to this Map by using it in a personal Map Device. Maps can only be used once.
5
72
Harvest
Wharf MapWharf MapMap Level: 68 Map Tier: 1 Guild Character: ËReach out into the abyss, and the abyss reaches back.Travel to this Map by using it in a personal Map Device. Maps can only be used once.
1
68
Delirium
Wharf MapWharf MapMap Level: 68 Map Tier: 1 Guild Character: ËReach out into the abyss, and the abyss reaches back.Travel to this Map by using it in a personal Map Device. Maps can only be used once.
1
68
Metamorph
Wharf MapWharf MapMap Level: 68 Map Tier: 1 Guild Character: ËReach out into the abyss, and the abyss reaches back.Travel to this Map by using it in a personal Map Device. Maps can only be used once.
1
68
Blight
Wharf MapWharf MapMap Level: 70 Map Tier: 3 Guild Character: ËReach out into the abyss, and the abyss reaches back.Travel to this Map by using it in the Templar Laboratory or a personal Map Device. Maps can only be used once.
3
70
Legion
Wharf MapWharf MapMap Level: 77 Map Tier: 10 Guild Character: ËReach out into the abyss, and the abyss reaches back.Travel to this Map by using it in the Templar Laboratory or a personal Map Device. Maps can only be used once.
10
77
Synthesis
Wharf MapWharf MapMap Level: 73 Map Tier: 6 Guild Character: ËReach out into the abyss, and the abyss reaches back.Travel to this Map by using it in the Templar Laboratory or a personal Map Device. Maps can only be used once.
6
73
Betrayal
Wharf MapWharf MapMap Level: 73 Map Tier: 6 Guild Character: ËTravel to this Map by using it in the Templar Laboratory or a personal Map Device. Maps can only be used once.
6
73
War for the Atlas
Wharf MapWharf MapMap Level: 73 Map Tier: 6 Guild Character: MTravel to this Map by using it in the Templar Laboratory or a personal Map Device. Maps can only be used once.
6
73
Atlas of Worlds
Shaped Wharf MapShaped Wharf MapMap Level: 78 Map Tier: 11 Guild Character: MTravel to this Map by using it in the Templar Laboratory or a personal Map Device. Maps can only be used once.
11
78
Atlas of Worlds
Wharf MapWharf MapMap Level: 69 Map Tier: 2 Guild Character: MTravel to this Map by using it in the Templar Laboratory or a personal Map Device. Maps can only be used once.
2
69
The Awakening
Wharf MapWharf MapMap Level: 67 Map Tier: 2 Guild Character: HTravel to this Map by using it in the Templar Laboratory or a personal Map Device. Maps can only be used once.
The following Maps have been added back to the Atlas: Arid Lake, Armoury, Barrows, Beach, Belfry, Cells, Chateau, Conservatory, Core, Crystal Ore, Desert Spring, Dig, Excavation, Fields, Flooded Mine, Fungal Hollow, Geode, Jungle Valley, Lighthouse, Malformation, Marshes, Pit, Racecourse, Ramparts, Relic Chambers, Scriptorium, Siege, Stagnation, Tower, Tropical Island, Waste Pool, and Wharf.
The following Maps have been removed from the Atlas: Arena, Arid Lake, Armoury, Barrows, Belfry, Bramble Valley, Cells, Chateau, Dig, Excavation, Fungal Hollow, Jungle Valley, Lava Chamber, Marshes, Mud Geyser, Park, Pen, Racecourse, Ramparts, Stagnation, Summit, Vault, Waste Pool, Waterways, and Wharf.
The following Maps have been added back to the Atlas: Alleyways, Arena, Barrows, Bog, Colonnade, Core, Crystal Ore, Desert, Factory, Foundry, Fungal Hollow, Lava Lake, Mud Geyser, Park, Pit, Ramparts, Reef, Residence, Sepulchre, Sunken City, Terrace, Tropical Island, Villa, and Wharf.
The following Maps have been removed from the Atlas: Alleyways, Barrows, Bog, Chateau, Core, Desert, Foundry, Fungal Hollow, Lava Lake, Leyline, Lighthouse, Mud Geyser, Park, Pit, Plateau, Primordial Blocks, Racecourse, Reef, Relic Chambers, Sepulchre, Siege, Spider Lair, Sulphur Vents, Sunken City, Terrace, Tropical Island, Waterways, and Wharf.
The entire Atlas has been reworked. Many map names have changed, as have their balance, tier and position on the Atlas. Many maps have also had their boss fights swapped or completely reworked.
The rules used to generate monsters in endgame maps have been significantly reworked and rebalanced around the rate at which we expect players to reliably clear out the map. In general, narrow, linear maps will contain fewer total monsters than maps with complex layouts. We will be closely monitoring and adjusting the balance of this change and expect to make further changes and improvements over time.


 The Gambler
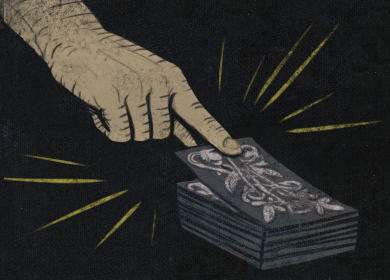 The Gambler
 Her Mask
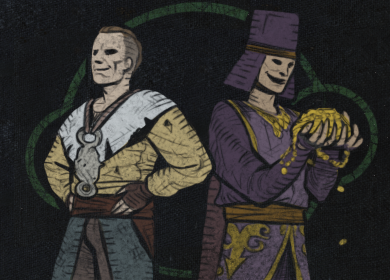 Lucky Connections
 Orb of Fusing
 Luck is a fool's game, and I know plenty of rich fools.
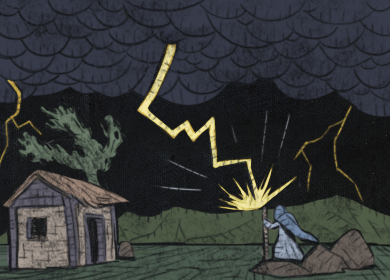 The Coming Storm
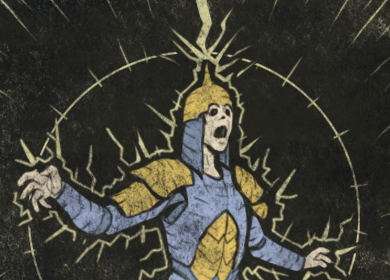 Struck by Lightning


_area_screenshot.jpg)