Atlas of Worlds
Specify the reason an update is needed using |reason=.
Quick Guide: This article has a quick guide that shows you how to explore the Atlas of Worlds, and how to chase the Conquerors and find The Maven.

The Atlas of Worlds is Path of Exile's end-game map system. The Atlas is a series of linked maps that players can progress through after completing a quest for Officer Kirac. It is explored and discovered by running maps within the Map Device at a player's hideout or a guild hideout.
The Atlas of Worlds is a visualization of the dream worlds that are opened by activating maps, indicating how these worlds are linked. The player starts at one of four starting maps in the center of the Atlas. These tier 1 maps start dropping on Act 8. Players can find new maps in adjacent, connected maps in the Atlas.
The Atlas comprises 118 different maps. Maps have a chance to drop in other connected maps, and they can be traded between players. The Atlas has 4 regions each of which have many maps within them. Each region has a citadel, which is an interface that allows socketing 4 watchstones within it. These watchstones can have various crafted modifiers, that players can add onto them using sextants. Quest watchstones drop from defeating the Conquerors, while craftable watchstones can be purchased from other players or obtained as boss drops. Each region also allows players to select unique Atlas passive skill perks that affect drops and environmental effects within that region, such as improving Blight, Harvest, Delirium or other types of content.
Every map has one or more unique bosses. The Atlas has two bonuses which affect map drops, being the Atlas Completion Bonus and the Awakening Completion Bonus. These bonuses must be earned by defeating the map boss under certain conditions.
The Atlas has many end-game bosses that players can fight, such as Sirus, Awakener of Worlds which can only be encountered by chasing the Conquerors across the Atlas, and The Maven which requires completion of the Maven's challenges in The Maven's Crucible. Other bosses like The Shaper, The Elder and Uber Elder can be fought repeatedly simply by using a special set of 4 map fragments in the Map Device.
Map Drops

Map drops are not completely random; instead, a specific tier is chosen first and the map type is chosen from a pool of maps completed for that tier or connected to the map the character is currently in.[1]
Only connected maps and maps previously completed can drop from a map area. In addition to these rules, this map drop pool only consists of maps that are currently visible on the Atlas meaning maps that are removed from changing Watchstones are removed from the drop pool. There are a couple exceptions: During Zana's missions where you can obtain maps without restrictions from your Atlas progression, unique maps which can also drop their base type, and various league content that may drop maps.
Equity
When a map drop's tier is rolled and no maps of that tier currently exist on the atlas, a map isn't dropped but instead adds to a "Map Equity" system that helps higher tier maps to drop.[2][confirmation needed because of 3.10 change]
Each Tier grants a different value of Equity that accumulates.
The values are tripled per tier (powers of 3), so the amount of equity granted by a Tier 1 Map is 1, and thus a Tier 2 map is 3, Tier 3 Map is 9 etc.[3]
Map Equity checks possible map drops in descending order - by first checking if it's high enough to drop a Tier 16, then Tier 15, then Tier 14, so on and so forth.
A Tier 16 Map requires 14,348,907 Equity to drop.
There is equity cap - 143,489,070 Equity (10x Tier 16 maps).[3]
Regions
The Atlas is split into 4 different regions, each affecting a Watchstone or Conqueror's area of influence and what item bases can drop.
The 4 regions are:
Atlas Completion Bonus
Tip: To locate a map on the Atlas, open the Atlas, then open your inventory and right-click the Map item. The map will be highlighted on the Atlas.
For each map completed under certain conditions, you gain an Atlas completion Bonus. Each Bonus adds a 1.5% chance for a map to drop one tier higher, with each 100% chance automatically upgrading the tier of the dropped map. The maximum map tier, however, cannot bypass drop restrictions, even if it would have been upgraded.[4]
For example, a rare monster in a tier 6 map with 125% completion bonus:
- a rare monster can drop tier +1 maps, as such it can drop tier 1 to 7 maps
- it will only drop maps that are adjacent or already unlocked (completed) on the atlas
- a tier 5 drop would be upgraded to tier 6, with a 25% chance to be upgraded to tier 7
- a tier 6 drop would be upgraded to tier 7, but can't be upgraded any further
- a tier 7 drop is already the highest possible drop, and can't be upgraded any further
Optional maps
The following maps do not count towards Atlas completion:
 Hall of GrandmastersHall of Grandmasters
Promenade MapMap Level: 73
Map Tier: 6
Guild Character: ÙContains the Immortalised Grandmasters
PvP damage scaling in effectThe grandest and greatest ever to fight,
Divine the champions stand tall.
But match their power, best their might,
And even the immortal may fall.Travel to this Map by using it in a personal Map Device. Maps can only be used once.
 Untainted ParadiseUntainted Paradise
Tropical Island MapMap Level: 70
Map Tier: 3(300-400)% increased Experience gain
Area has increased monster variety
Area is inhabited by wild Animals
Monsters drop no ItemsFor this beauty,
beauty without strength,
chokes out life.Activate a Map to begin Kirac's Mission.
 The Perandus ManorThe Perandus Manor
Chateau MapMap Level: 72
Map Tier: 5
Guild Character: ™
Item Quantity: +(60-100)%
Item Rarity: +(200-300)%(100-150)% increased Experience gain
(200-300)% increased number of Rare Monsters
(30-40)% more Monster Life
(16-24)% increased Monster Damage
Area contains Cadiro PerandusForget kings and emperors;
He who holds the coin holds all the power.Travel to this Map by using it in a personal Map Device. Maps can only be used once.
- The Beachhead (all 3 tiers)
 Infused BeachheadInfused Beachhead
Harbinger MapMap Level: 83
Map Tier: 16100% more Monster Life
100% increased Monster Damage
Unique Boss drops an additional Harbinger Scroll
Area contains 20 additional HarbingersCorrupted
Travel to this Map by using it in a personal Map Device. Maps can only be used once.
 Altered Distant MemoryAltered Distant Memory
Synthesised MapMap Level: 81
Map Tier: 11
Item Quantity: +100%
Monster Pack Size: +25%25% increased Pack size
100% increased Experience gain
Monster Level: 81
Map has (3-5) additional random Modifiers
Map has (2-4) additional Synthesis Global ModifiersCorruptedThe winters of my youth were cold and harsh.
We had nothing, yet to my mother's credit, I wanted for so little.Travel to this Map by using it in a personal Map Device. Maps can only be used once.
 Augmented Distant MemoryAugmented Distant Memory
Synthesised MapMap Level: 81
Map Tier: 11
Item Quantity: +100%
Monster Pack Size: +25%25% increased Pack size
100% increased Experience gain
Monster Level: 81
Map has (3-5) additional random Modifiers
Map has (2-4) additional Synthesis Global ModifiersCorruptedWhat had seemed sacred and infallible so quickly became flawed out of necessity.
Created from compromises. Vulnerable to mortal whims.Travel to this Map by using it in a personal Map Device. Maps can only be used once.
 Rewritten Distant MemoryRewritten Distant Memory
Synthesised MapMap Level: 81
Map Tier: 11
Item Quantity: +100%
Monster Pack Size: +25%25% increased Pack size
100% increased Experience gain
Monster Level: 81
Map has (3-5) additional random Modifiers
Map has (2-4) additional Synthesis Global ModifiersCorruptedIt was in my oath that I found peace.
In echoing marble halls I found my voice.
Before the congregation I found purpose.Travel to this Map by using it in a personal Map Device. Maps can only be used once.
 Twisted Distant MemoryTwisted Distant Memory
Synthesised MapMap Level: 81
Map Tier: 11
Item Quantity: +100%
Monster Pack Size: +25%25% increased Pack size
100% increased Experience gain
Monster Level: 81
Map has (3-5) additional random Modifiers
Map has (2-4) additional Synthesis Global ModifiersCorruptedWithout our strict rule, man's destructive side would take hold.
Our beautiful public spaces, our services for the ill and the needy, all of it would crumble.Travel to this Map by using it in a personal Map Device. Maps can only be used once.
 CortexCortex
Synthesised MapMap Level: 83
Map Tier: 11
Item Quantity: +100%
Monster Pack Size: +25%25% increased Pack size
100% increased Experience gain
Monster Level: 83
Map has (3-5) additional random Modifiers
Map has (2-4) additional Synthesis Global ModifiersCorruptedThough my life is gone, my purpose is not.
My will remains, emboldened and empowered by the righteousness of my cause.Travel to this Map by using it in a personal Map Device. Maps can only be used once.
- Replica CortexReplica Cortex
Synthesised MapMap Level: 84
Map Tier: 11
Item Quantity: +100%
Monster Pack Size: +25%25% increased Pack size
200% increased Experience gain
Monster Level: 84
Map has (6-8) additional random Modifiers
Map has (4-6) additional Synthesis Global ModifiersCorrupted"Did nobody think to report that we had acquired some sort of free-floating
Memory? Cease testing and lock this away immediately!"
- Administrator QotraTravel to this Map by using it in a personal Map Device. Maps can only be used once.  Forge of the Phoenix MapForge of the Phoenix MapMap Level: 83
Map Tier: 16
Guild Character: ¤Area is influenced by The ShaperOne of my captors refused redemption.
He did not see value in a new life.
Now new life surrounds him.Travel to this Map by using it in a personal Map Device. Maps can only be used once.
 Lair of the Hydra MapLair of the Hydra MapMap Level: 83
Map Tier: 16
Guild Character: ¢Area is influenced by The ShaperOne of my captors wore many faces,
yet kept her true face hidden.
Now she cannot escape her true face.Travel to this Map by using it in a personal Map Device. Maps can only be used once.
 Maze of the Minotaur MapMaze of the Minotaur MapMap Level: 83
Map Tier: 16
Guild Character: £Area is influenced by The ShaperOne of my captors felt no emotion.
He did not hesitate to inflict pain.
Now all he feels is intense, unstoppable agony.Travel to this Map by using it in a personal Map Device. Maps can only be used once.
 Pit of the Chimera MapPit of the Chimera MapMap Level: 83
Map Tier: 16
Guild Character: ÂArea is influenced by The ShaperOne of my captors hid a beast within his heart.
Now his true self can be seen by all.Travel to this Map by using it in a personal Map Device. Maps can only be used once.
 Academy MapAcademy MapMap Level: 76
Map Tier: 9
Guild Character: ÆThey came for enlightenment,
but were imprisoned by madness.Travel to this Map by using it in a personal Map Device. Maps can only be used once.
 Arachnid Tomb MapArachnid Tomb MapMap Level: 73
Map Tier: 6
Guild Character: !They feel your every move,
your every breath,
with a million little wires.Travel to this Map by using it in a personal Map Device. Maps can only be used once.
 Arena MapArena MapMap Level: 82
Map Tier: 15
Guild Character: tThe sound of a thousand calls
for blood echo for eternity.Travel to this Map by using it in a personal Map Device. Maps can only be used once.
 Bazaar MapBazaar MapMap Level: 83
Map Tier: 16
Guild Character: YGreed is the only god here.Travel to this Map by using it in a personal Map Device. Maps can only be used once.
 Beach MapBeach MapMap Level: 69
Map Tier: 2
Guild Character: XA paradise, forever replenished by
endless waves teeming with life.Travel to this Map by using it in a personal Map Device. Maps can only be used once.
 Belfry MapBelfry MapMap Level: 69
Map Tier: 2
Guild Character: wBells are rung in celebration, and in sorrow.
And, finally, in despair.Travel to this Map by using it in a personal Map Device. Maps can only be used once.
 Bramble Valley MapBramble Valley MapMap Level: 74
Map Tier: 7
Guild Character: ™The faintest traces of civilisation
defiantly resist nature's scouring tendrils.
An admirable, but futile, effort.Travel to this Map by using it in a personal Map Device. Maps can only be used once.
 Burial Chambers MapBurial Chambers MapMap Level: 72
Map Tier: 5
Guild Character: EVile fiends hide beneath
the peaceful plains.Travel to this Map by using it in a personal Map Device. Maps can only be used once.
 Cage MapCage MapMap Level: 72
Map Tier: 5
Guild Character: ITreat a man like a wild animal,
and he will soon learn to bite.Travel to this Map by using it in a personal Map Device. Maps can only be used once.
 Castle Ruins MapCastle Ruins MapMap Level: 83
Map Tier: 16
Guild Character: êWhen the castle falls,
it has failed its only purpose.Travel to this Map by using it in a personal Map Device. Maps can only be used once.
 Channel MapChannel MapMap Level: 70
Map Tier: 3
Guild Character: ZThe stone cannot stop the torrent.
It can only divert it.Travel to this Map by using it in a personal Map Device. Maps can only be used once.
 City Square MapCity Square MapMap Level: 75
Map Tier: 8
Guild Character: ÖCountless generations have
walked these time-worn stones.Travel to this Map by using it in a personal Map Device. Maps can only be used once.
 Cold River MapCold River MapMap Level: 82
Map Tier: 15
Guild Character: ëIce forges a fickle path,
as those beneath its veil can attest.Travel to this Map by using it in a personal Map Device. Maps can only be used once.
 Colonnade MapColonnade MapMap Level: 71
Map Tier: 4
Guild Character: .Small minds demand
the largest structures.Travel to this Map by using it in a personal Map Device. Maps can only be used once.
 Coral Ruins MapCoral Ruins MapMap Level: 74
Map Tier: 7
Guild Character: ÁThrust above the waves, still teeming
with horrors from the depths.Travel to this Map by using it in a personal Map Device. Maps can only be used once.
 Courthouse MapCourthouse MapMap Level: 74
Map Tier: 7
Guild Character: fJustice born of love is a surrender.
Justice born of law is a punishment.Travel to this Map by using it in a personal Map Device. Maps can only be used once.
 Coves MapCoves MapMap Level: 77
Map Tier: 10
Guild Character: ÊThe dark seas swallow the careless
and spit them against sharp rocks.Travel to this Map by using it in a personal Map Device. Maps can only be used once.
 Crater MapCrater MapMap Level: 77
Map Tier: 10
Guild Character: DSo much power in the hands of so few.Travel to this Map by using it in a personal Map Device. Maps can only be used once.
 Crystal Ore MapCrystal Ore MapMap Level: 70
Map Tier: 3
Guild Character: åAs the torch flickers, brilliance
emerges in boundless variance.Travel to this Map by using it in a personal Map Device. Maps can only be used once.
 Desert Spring MapDesert Spring MapMap Level: 68
Map Tier: 1
Guild Character: çAs mirage becomes reality,
hardship is briefly quenched.Travel to this Map by using it in a personal Map Device. Maps can only be used once.
 Excavation MapExcavation MapMap Level: 77
Map Tier: 10
Guild Character: STwo unexplored frontiers remain:
The skies and the soil.Travel to this Map by using it in a personal Map Device. Maps can only be used once.
 Factory MapFactory MapMap Level: 75
Map Tier: 8
Guild Character: ÎRepetition. Convention. Duplication.
Creation distilled to perfection.Travel to this Map by using it in a personal Map Device. Maps can only be used once.
 Frozen Cabins MapFrozen Cabins MapMap Level: 75
Map Tier: 8
Guild Character: äThe fleet lay stranded in the winter wastes,
those aboard to never again see the light of day.Travel to this Map by using it in a personal Map Device. Maps can only be used once.
 Geode MapGeode MapMap Level: 78
Map Tier: 11
Guild Character: "Many hands may
move a mountain.Travel to this Map by using it in a personal Map Device. Maps can only be used once.
 Graveyard MapGraveyard MapMap Level: 72
Map Tier: 5
Guild Character: NUnknown legacies.
Untold stories.Travel to this Map by using it in a personal Map Device. Maps can only be used once.
 Iceberg MapIceberg MapMap Level: 69
Map Tier: 2
Guild Character: HIcy fangs seek tender hulls
to sink themselves into.Travel to this Map by using it in a personal Map Device. Maps can only be used once.
 Infested Valley MapInfested Valley MapMap Level: 69
Map Tier: 2
Guild Character: ŒShould we feel disgusted at how the weak predate
the strong, or should we feel... admiration?Travel to this Map by using it in a personal Map Device. Maps can only be used once.
 Ivory Temple MapIvory Temple MapMap Level: 82
Map Tier: 15
Guild Character: mMan and nature intertwined,
but only for the chosen few.Travel to this Map by using it in a personal Map Device. Maps can only be used once.
 Jungle Valley MapJungle Valley MapMap Level: 75
Map Tier: 8
Guild Character: 5Verdant canopies shroud the world in darkness.Travel to this Map by using it in a personal Map Device. Maps can only be used once.
 Lava Chamber MapLava Chamber MapMap Level: 83
Map Tier: 16
Guild Character: QFiend and fortune-hunter alike turned to ash.
A sorry alliance of unending agony.Travel to this Map by using it in a personal Map Device. Maps can only be used once.
 Marshes MapMarshes MapMap Level: 72
Map Tier: 5
Guild Character: 2Embraced by mud. Grasped by roots.
The careless are silently swallowed.Travel to this Map by using it in a personal Map Device. Maps can only be used once.
 Mesa MapMesa MapMap Level: 82
Map Tier: 15
Guild Character: ÒBarren and sun-bleached.
Emptiness as far as
the eye can reach.Travel to this Map by using it in a personal Map Device. Maps can only be used once.
 Pen MapPen MapMap Level: 74
Map Tier: 7
Guild Character: bSlaves held like cattle. A blood-soaked
revolution, just waiting to happen.Travel to this Map by using it in a personal Map Device. Maps can only be used once.
 Peninsula MapPeninsula MapMap Level: 73
Map Tier: 6
Guild Character: *The farmer no longer plows
or sows. Only the flattened
soil remains.Travel to this Map by using it in a personal Map Device. Maps can only be used once.
 Phantasmagoria MapPhantasmagoria MapMap Level: 72
Map Tier: 5
Guild Character: oEvery movement is watched,
recorded, remembered.Travel to this Map by using it in a personal Map Device. Maps can only be used once.
 Pier MapPier MapMap Level: 69
Map Tier: 2
Guild Character: zMan's reach extends into
the ocean, clawing at
its infinite depths.Travel to this Map by using it in a personal Map Device. Maps can only be used once.
 Precinct MapPrecinct MapMap Level: 71
Map Tier: 4
Guild Character: :Crushed together and fenced in,
to live out their lives like cattle.Travel to this Map by using it in a personal Map Device. Maps can only be used once.
 Primordial Pool MapPrimordial Pool MapMap Level: 71
Map Tier: 4
Guild Character: ÂA dough of bad blood.
A yeast of ill will.Travel to this Map by using it in a personal Map Device. Maps can only be used once.
 Ramparts MapRamparts MapMap Level: 70
Map Tier: 3
Guild Character: ÜA wall is the surest sign for raiders
that there is something of value to take.Travel to this Map by using it in a personal Map Device. Maps can only be used once.
 Residence MapResidence MapMap Level: 78
Map Tier: 11
Guild Character: THome only to misery now.Travel to this Map by using it in a personal Map Device. Maps can only be used once.
 Scriptorium MapScriptorium MapMap Level: 68
Map Tier: 1
Guild Character: ‡Knowledge balanced atop a vast pit. Hold on,
or perish in the darkness of ignorance.Travel to this Map by using it in a personal Map Device. Maps can only be used once.
 Shipyard MapShipyard MapMap Level: 68
Map Tier: 1
Guild Character: vThe stone and lumber sleeps.
The captains are long dead.
Only the sea knows their end.Travel to this Map by using it in a personal Map Device. Maps can only be used once.
 Shrine MapShrine MapMap Level: 80
Map Tier: 13
Guild Character: èBlack tiles don't stain so easily.Travel to this Map by using it in a personal Map Device. Maps can only be used once.
 Villa MapVilla MapMap Level: 78
Map Tier: 11
Guild Character: ³Wealth is powerless to stop
the corroding force of time.Travel to this Map by using it in a personal Map Device. Maps can only be used once.
 Volcano MapVolcano MapMap Level: 70
Map Tier: 3
Guild Character: iTremble in the might of the flames.Travel to this Map by using it in a personal Map Device. Maps can only be used once.
Special areas like Map fragment. misc map item zones also do not add others Atlas completion.
Awakening Level
Tip: To quickly get to Awakening Level 8 without chasing the conquerers, buy cheap Chromuium or Titanium watchstones and fill all the citadel sockets in your Atlas.
The Awakening Level of your Atlas is the number of Watchstones you have socketed, divided by 2, and rounded down.
The highest Awakening Level obtainable using only watchstones is A8, however after the Echoes of the Atlas expansion, players can obtain A9 using the Atlas Awakened skill from The Uncharted Realms Atlas passive skill tree.
Awakening Levels increase the difficulty of all map bosses due to the "Unique map boss has X% more life", but grant bonuses to item drops when killing those bosses. It also enables Awakened Atlas completion bonuses at higher levels, granting further bonuses to map drops.
Each Awakening Level adds the following:
- Unique Map Boss has 3% more Life
- +1% chance for an additional connected Map to drop from Unique Map Boss
- +0.5% chance for a Shaper Guardian Map to drop from Unique Map Boss (Tier 14+)
- +0.5% chance for an Elder Guardian Map to drop from Unique Map Boss (Tier 14+)
- +1% chance for an additional Unique Item to drop from Unique Map Boss
- +1% chance for additional Map Currency Item to drop from Unique Map Boss
- Increased chance per Awakening Level for the Conquerors of the Atlas to drop additional rewards
- 5% increased chance for Influenced Items to drop in Maps influenced by the Conquerors of the Atlas
Awakening Completion Bonus
Awakened Atlas completion bonuses are acquired by completing the map at a certain Awakening Level or higher. In order to complete an Awakening Bonus Objective, it is merely required to finish the map at it's maximum tier while it is influenced by four Watchstones, while the Awakening Level requirement is met. Rarity or corruption of the map is irrelevant.
- 1% increased effect of Modifiers on non-unique Maps (per 4 Awakening Bonus)
Favourite Maps
Once you've completed all base maps in a region, you unlock a favourite map slot for that region. Map bases you marked as favourites are 10 times more likely to drop than other map bases in the region. A second and third slot can be unlocked by completing all Atlas objectives, and Awakened Atlas objectives, respectively. The same map can be favourited multiple times, making it 20 or 30 times more likely to drop than other map bases in the region.
Atlas Missions
Once per day, when you log in, you will receive one Atlas missions for each master for the tier relative to the last map you've completed (-1/+1 range). Free Atlas missions refresh at midnight UTC. The map must be completed the day before in their own map device. Completing party-play maps from other players map devices does not count. Completing blighted maps do count.
Each time you complete a map, there is a 35% chance to receive an Atlas Mission for a random master. You can use Atlas Missions to guarantee a master to spawn in your next non-unique map. Your Atlas Mission counters are tracked for each set of map tier colours: white, yellow, and red; which one you receive is the same as the tier colour of the map you received it in. Your accumulated number of Atlas Missions can be seen in the Atlas layout screen. There is no limit to how many Atlas Missions you can store. You can redeem an Atlas mission by speaking to a master then running the map from that screen, or via the mission buttons in the map device interface.
Note that as only a single master can appear per map, the use of a master mission will prevent triggering other sources of master spawning, including the flat 10% chance of triggering a random master per map. It is possible to get a slight increase in chance of encountering a specific master, by avoiding atlas missions for the other masters.
Conquerors of the Atlas
When exploring a map, there is a chance that one of the Conquerors of the Atlas, Al-Hezmin, the Hunter; Veritania, the Redeemer; Drox, the Warlord; and Baran, the Crusader, appears and spreads influence over the Atlas region. Whenever a Conqueror appears in a map, they will occupy the Atlas region and add packs of special influenced monsters to the map whenever they appear. After their third appearance, you can speak to Officer Kirac to locate their Citadel, then talk to Zana to open a map device screen with a map where the Conqueror's Citadel is located. This map can be modified and can have map fragment and Scarab bonuses applied to it, but only 20% of the map's Item Quantity bonus will apply to the Conqueror boss. Once you defeat the Citadel's map boss, a portal leading to the Conqueror's arena opens up, where you can fight the Conqueror themselves. Each Conqueror will drop a Watchstone on defeat, which you can slot in a Citadel to upgrade all maps within the region to higher tiers and possibly reveal new ones.
Influenced monsters and the Conquerors have a chance to drop Influenced items, special item bases which can roll mods unavailable to regular items.
Finding Watchstones

To spawn a Conqueror for the first time, keep running maps in that region until they show up. Once they make their appearance, they will reappear whenever you run a new map located within the same region. Opening a new map with the same base as the last one is allowed. After they drop their first Watchstone, to get the next Watchstone, you will need to explore maps in regions with the required number of Watchstones. The map's tier must also be equal or greater than the base displayed on the Atlas. Before defeating Sirus, a Conqueror will always appear in each new map as long as the requirements are filled, but they will not reappear in the same region. Hovering over the Watchstone slots on the left side of the Atlas screen will display the requirements needed to spawn a Conqueror.
After ending the individual quests: ![]() The Hunter,
The Hunter, ![]() The Redeemer,
The Redeemer, ![]() The Crusader,
The Crusader, ![]() The Warlord and defeating all four Conquerors, you can fight Sirus, Awakener of Worlds. Once the four Conquerors are defeated, speak to Zana to open six portal to Sirus. After you defeat Sirus or lose all portals against him, you must defeat all the Conquerors again in order to refight Sirus.
The Warlord and defeating all four Conquerors, you can fight Sirus, Awakener of Worlds. Once the four Conquerors are defeated, speak to Zana to open six portal to Sirus. After you defeat Sirus or lose all portals against him, you must defeat all the Conquerors again in order to refight Sirus.
After defeating Sirus for the first time, you can spawn a Conqueror in any region with four Watchstones (you can spawn the same Conqueror in regions you've already acquired a Watchstone from), but you will need to run more than three maps to be able to fight them again. There is a 50% chance for a Conqueror to appear for the first time. Afterwards, the Conqueror will reappear after running a specified number of maps in the influenced region. A bar on the left side of the Atlas screen shows how many steps are required to spawn a Conqueror. The blue square shows when the Conqueror will appear and spawn influenced monsters. Defeating Sirus is not required to acquire more Watchstones.
Currency
- Sextants are used on Watchstones to add a special modifier to all the maps on the region where the Watchstone is socketed. Sextants last for 3 maps, and multiple Watchstones with sextant modifiers can stack.[1]
End of league transfer
When the current league ends the progress on the Atlas of Worlds is transferred to the relevant parent league. The parent league is generally Standard or Hardcore.
The merge has the following rules:[5]
- Maps or bonus objectives completed transferred to the parent league
- Sextant mods:
- They will be moved to the parent league; if the map already has a mod, the parent league mods will be kept
- Legacy modifiers continue to exist and work as long they have not been overridden
Permanent league catch up mechanics
A catch up mechanics was added to the Atlas since version 2.4.0.[6]
The latest rule is:[7]
- Running a high-tier map from a Legacy Map Series in Standard with the Bonus Objective and Awakening Bonus Objective prerequisites fulfilled will now auto-complete all maps with a base tier that is lower, including their Bonus Objectives and Awakening Bonus Objectives, if the Awakening Bonus Objective requirement was the same or lower than the completed map.
Since the Atlas shuffled every time at the start of new league and big patch (currently each time the game release the 3.X.0 patch). Using a T16 map (natural tier 16 map) from the legacy map series will unlock the completion of T1-15 maps. If it is a rare corrupted legacy map, it will also unlock all bonus Objective of the T1-15 map. If the Atlas is socketed with 8 sets of Watchstones (Awakening Level 8) when completing the legacy map (such as using legacy ![]() Vaal Temple MapVaal Temple MapMap Level: 83
Vaal Temple MapVaal Temple MapMap Level: 83
Map Tier: 16
Guild Character: >Area contains 10 additional guarded Vaal VesselsVoices. Visions. Violence.
They will haunt these grounds for all of eternity.Travel to this Map by using it in a personal Map Device. Maps can only be used once.![]() ), it will also unlock all Awakening Bonus Objective of T1-15 maps that requires Awakening Level 8.
), it will also unlock all Awakening Bonus Objective of T1-15 maps that requires Awakening Level 8.
Atlas exclusive base items
This is a list of base item types that are considered end-game only base types. These items cannot be found in the acts, and are rarer than the default base types.
Item types
| Item | Stats | |
|---|---|---|
| Apothecary's Gloves Energy Shield: (29-33)Requires Level 70, 46 Str, 59 Int(14-18)% increased Damage over Time | 70 | (14-18)% increased Damage over Time |
| Fingerless Silk Gloves | 70 | (12-16)% increased Spell Damage |
| Fugitive Boots Energy Shield: (32-37)Requires Level 70, 56 Dex, 76 Int+(13-17)% to Chaos Resistance | 70 | +(13-17)% to Chaos Resistance |
| Gripped Gloves | 70 | (14-18)% increased Projectile Attack Damage |
| Spiked Gloves | 70 | (16-20)% increased Melee Damage |
| Two-Toned Boots Energy Shield: (26-30)Requires Level 70, 62 Dex, 62 Int+(8-12)% to Cold and Lightning Resistances | 70 | +(8-12)% to Cold and Lightning Resistances |
| Two-Toned Boots Evasion: (126-145)Requires Level 70, 62 Str, 62 Dex+(8-12)% to Fire and Cold Resistances | 70 | +(8-12)% to Fire and Cold Resistances |
| Two-Toned Boots Energy Shield: (26-30)Requires Level 70, 62 Str, 62 Int+(8-12)% to Fire and Lightning Resistances | 70 | +(8-12)% to Fire and Lightning Resistances |
| Convoking Wand Physical Damage: 30-55 Critical Strike Chance: 7.00% Attacks per Second: 1.40Requires Level 72, 242 IntMinions deal (26-30)% increased Damage | 72 | Minions deal (26-30)% increased Damage |
| Bone Helmet Energy Shield: (40-46)Requires Level 73, 76 Str, 76 IntMinions deal (15-20)% increased Damage | 73 | Minions deal (15-20)% increased Damage |
| Artillery Quiver | 74 | (20-30)% increased Totem Placement speed |
| Marble Amulet | 74 | Regenerate (1.2-1.6)% of Life per second |
| Seaglass Amulet | 74 | (10-15)% faster start of Energy Shield Recharge |
| Blue Pearl Amulet | 77 | (48-56)% increased Mana Regeneration Rate |
| Vanguard Belt | 78 | +(260-320) to Armour and Evasion Rating |
| Crystal Belt | 79 | +(60-80) to maximum Energy Shield |
| Cerulean Ring | 80 | (8-10)% increased maximum Mana |
| Iolite Ring | 80 | (17-23)% increased Chaos Damage |
| Opal Ring | 80 | (15-25)% increased Elemental Damage |
| Steel Ring | 80 | Adds (3-4) to (10-14) Physical Damage to Attacks |
| Vermillion Ring | 80 | (5-7)% increased maximum Life |
Gallery
-
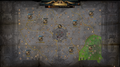
The 3.15 atlas. Showing the citadels and watchstone altars from the Conquerors of the Atlas expansion, socketed craftable watchstones, UI of the Uncharted Realms passive skill and the Maven progress bar from the Echoes of the Atlas expansion.
-

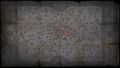
The Atlas introduced in Betrayal expansion with all maps completed.
-

The Atlas introduced in War for the Atlas expansion with all maps completed.
-

The Atlas introduced in Atlas of Worlds expansion with all maps completed.
-
The Atlas screenshot from the Atlas of Worlds expansion official webpage
.png)


Version history
| Version | Changes |
|---|---|
| 3.16.0 |
|
| 3.14.0 |
|
| 3.13.0 |
|
| 3.11.0 |
|
| 3.10.0 |
|
| 3.9.3 |
|
| 3.9.2e |
|
| 3.9.2c |
|
| 3.9.1 |
|
| 3.9.0c |
|
| 3.9.0 |
|
| 3.5.0 |
|
| 3.4.0 |
|
| 3.3.0 |
|
| 3.1.0 |
|
| 2.4.0 |
|
See also
References
- ↑ 1.0 1.1 Masterseek (August 13, 2016). "Path of Exile: Atlas of Worlds Interview. A Map of Condensed Hype.". 2p.com. Retrieved August 13, 2016.
- ↑ KarvarouskuGaming (January 19, 2020). "Issues concerning the new Atlas: 3) Removal of downgrade mechanics". Official Path of Exile Subreddit. Retrieved May 7, 2020.
- ↑ 3.0 3.1 Community_Team (May 27, 2021). "Game Mechanics Q&A Answer Part 2". Official Path of Exile Forums. Retrieved May 29, 2021.
- ↑ Chris (August 29, 2016). "Forum - Development Manifesto - Cumulative Atlas Completion Bonus - Path of Exile". Grinding Gear Games. Retrieved August 29, 2016.
- ↑ Negitivefrags (November 12, 2016). "[Question]What happens to the atlas and the sextant mods when essence gets transferred to standard?". Reddit. Retrieved January 25, 2017.
- ↑ Chris (August 24, 2016). "Detailed Atlas Mechanics". Path of Exile forums. Retrieved December 2, 2020.
- ↑ version 3.9.3 hotfix patch note
| Mechanics | |
|---|---|
| Characters | |
| Bosses | |
| Quests | |
| Atlas expansions | |